
This post is also available in:
![]() Português
Português
In this tutorial, I will show how to apply PSU in multiple Oracle Databases simultaneously using the Enterprise Manager 12c. This is a very useful feature available specially when you have tens or hundreds of databases in your EM and you want to patch them all without the need to do it one by one.
In this scenario, the situation that I have is:
- OEM 12c: 12.1.0.5 (with Bundle 4 applied)
- Target Databases: 12.1.0.2 (with PSU 4 applied) – Linux x86-64
- Target: Apply Patch PSU 5 (Oct 2015) in 2 DB’s in parallel
So let’s start!
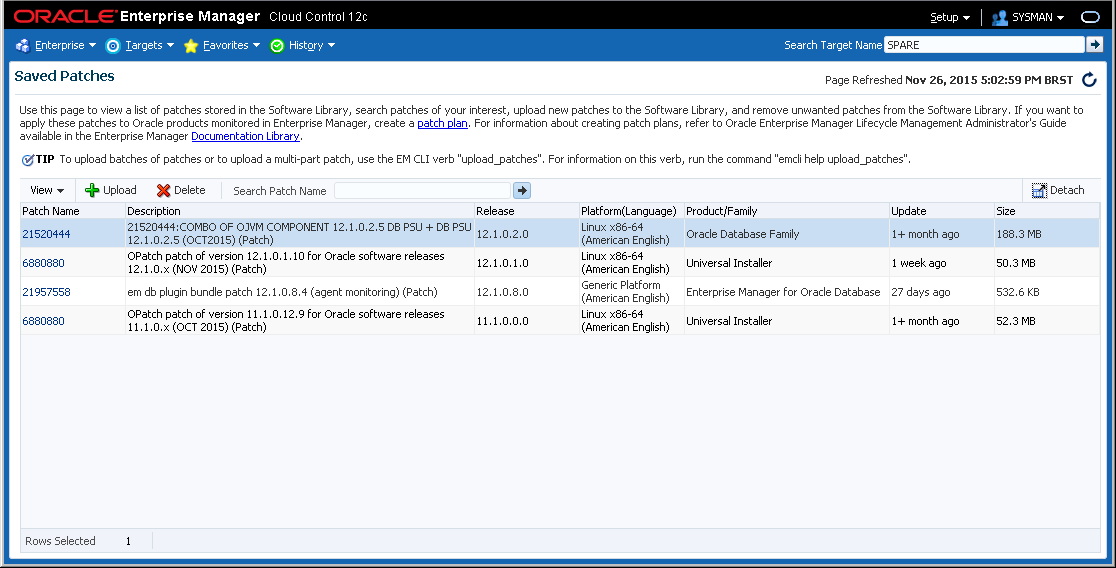
The first task will be to upload to EM Repository the patch that I want to apply in the DB’s.
Connect into EM and access “Enterprise -> Provisioning and Patching -> Saved Patches“.
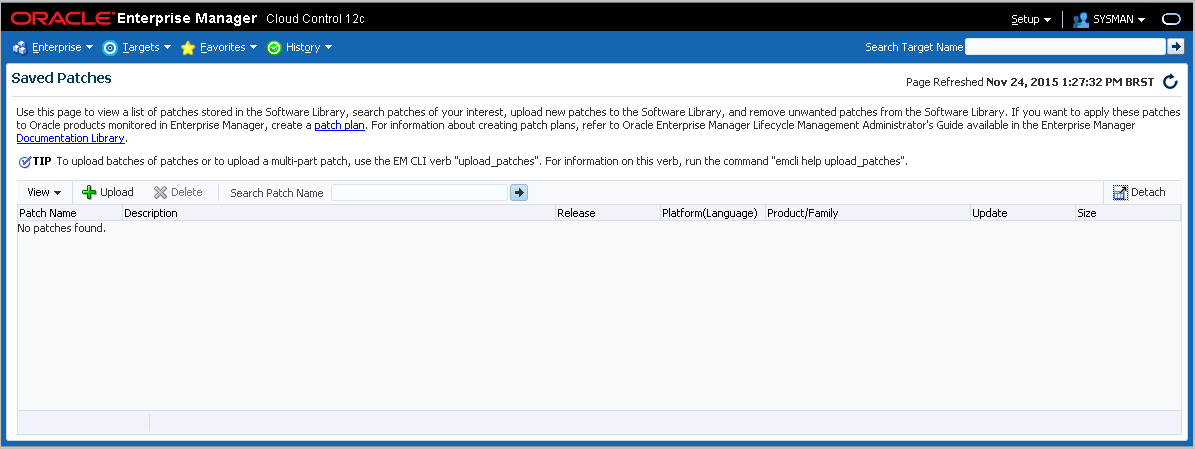
Note that the list above is inittialy empty.
In another tab, download the Patch that you want to apply. In this tutorial, I’m applying the PSU 5 for Oracle DB 12.1.0.2 (PSU p21520444_121020_Linux-x86-64.zip).
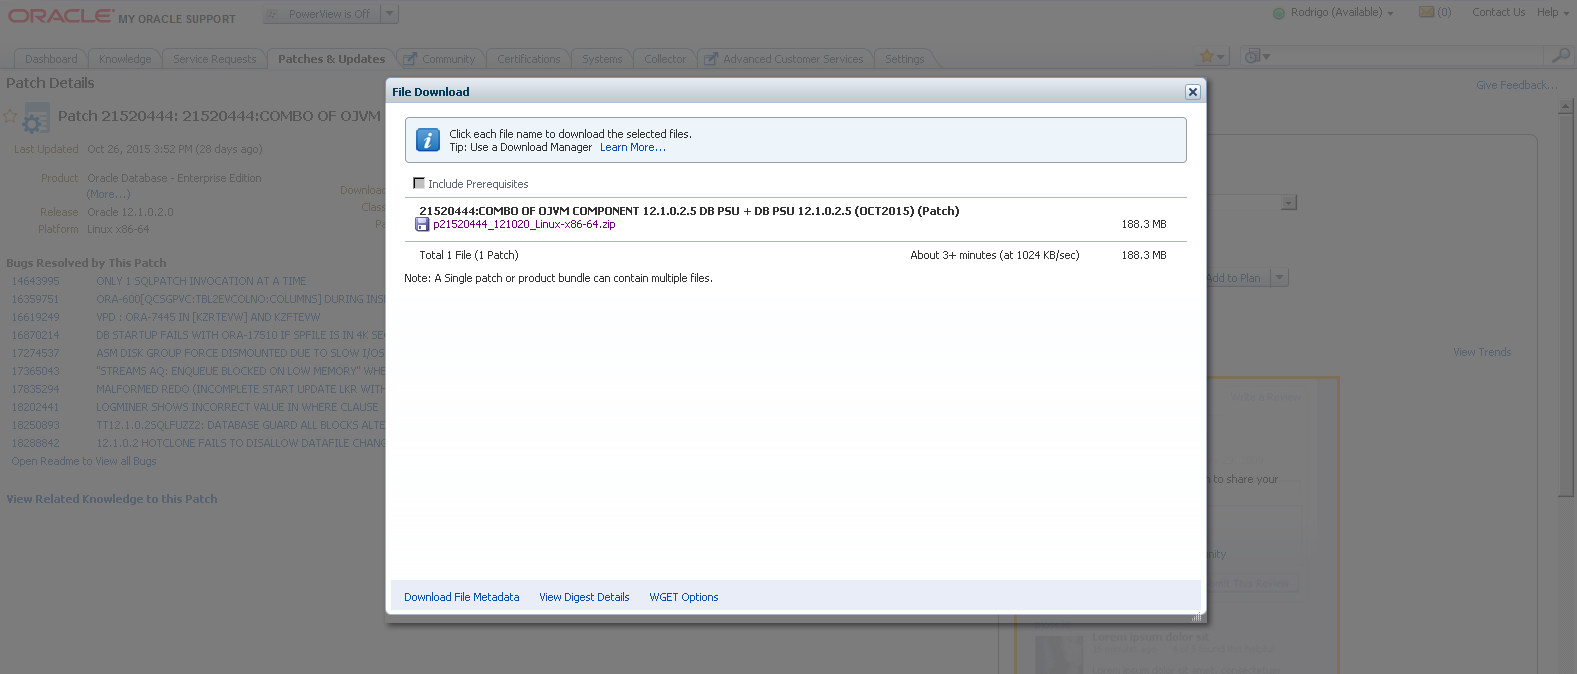
As this zip contains the “PatchSearch.xml” file inside, you don’t need to download the Metadata for it. In some cases where this file is not ziped you do need, as we’re going to see very soon.
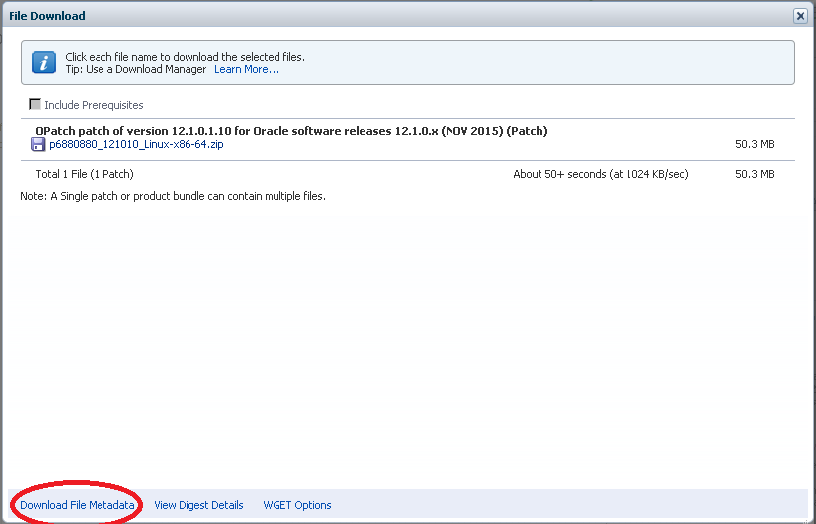
Download also the latest OPatch that is compatible with the target database server. In my case, it’s a Linux x86_64.

The OPatch zip does not contain the “PatchSearch.xml” inside. So, download the metadata file (p6880880_121010_American.txt).
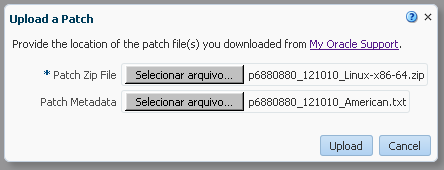
Returning to Enterprise Manager, upload both patches. For OPatch, add the metadata:
Now let’s start!
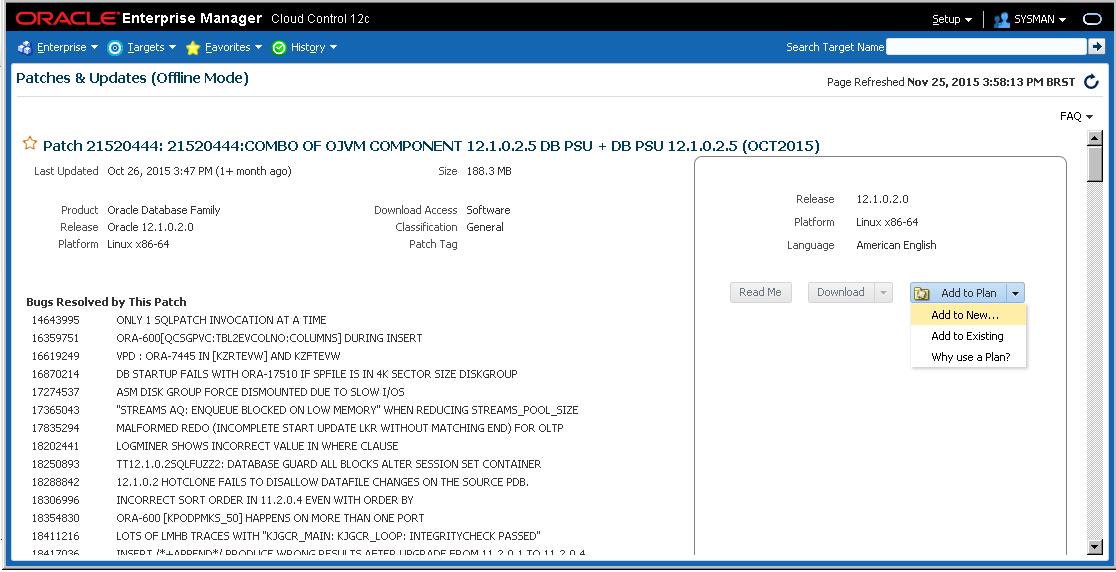
Click over the “patch name” you want to apply. In my case, it’s 21520444.
Click in “Add to Plan -> Add to New“.
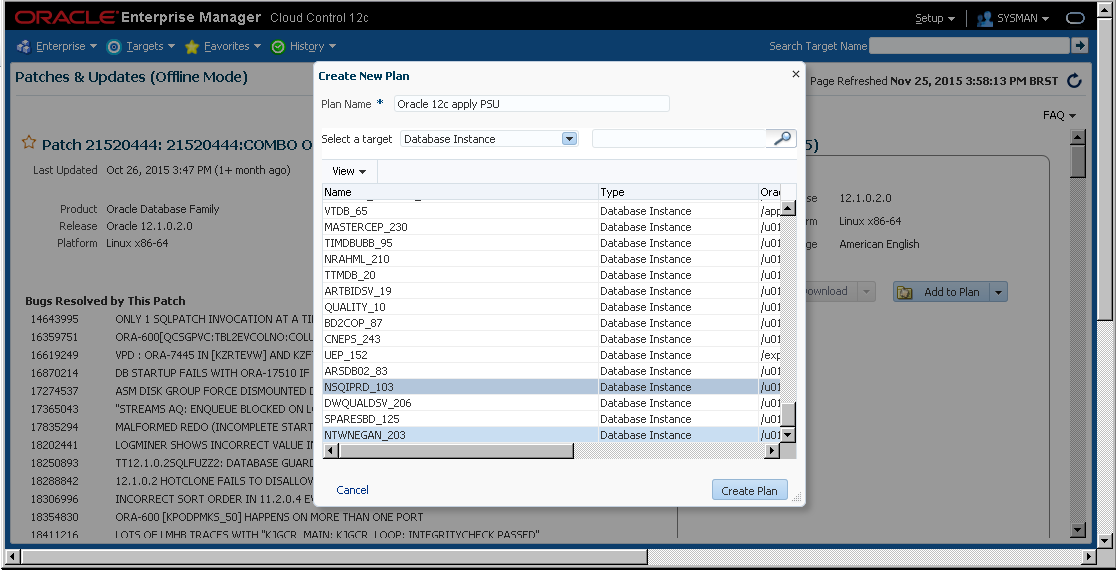
Give the plan a name and choose the Databases Servers you want to apply the PSU. In my case, I will choose 2 databases: NSQIPRD and NTWNEGAN.
After it, press “Create Plan“.
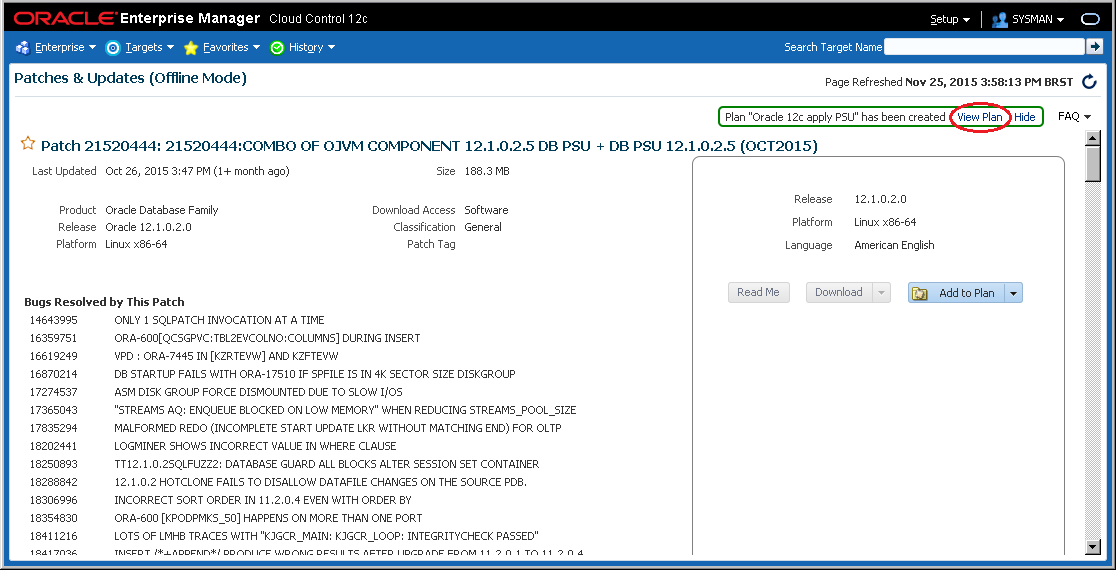
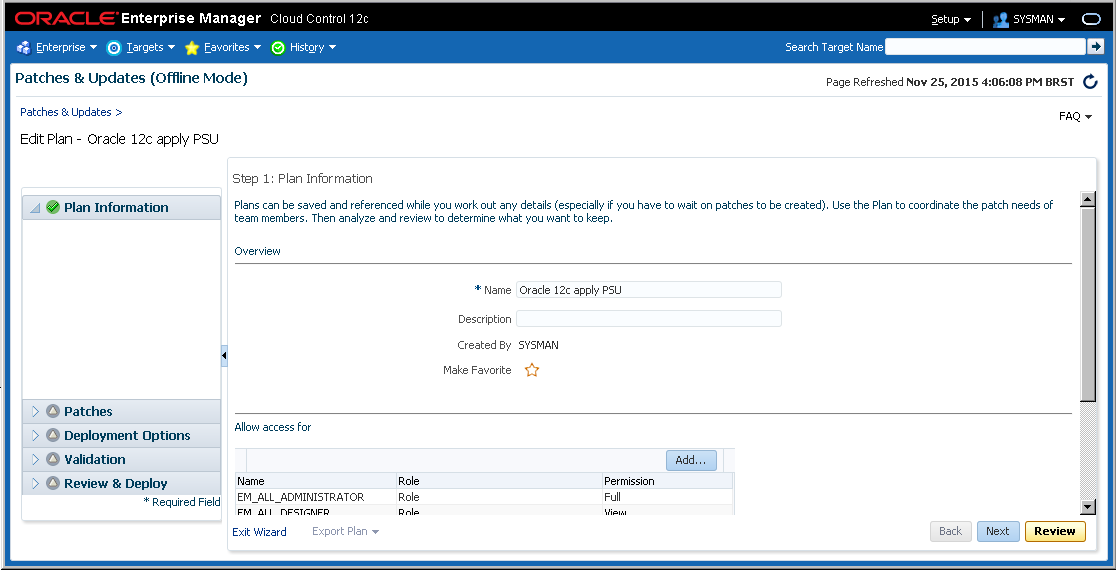
The plan is created. Click now in “View Plan“. If you change screen, you can check your created plans anytime visiting “Enterprise -> Provisioning and Patching -> Patches & Updates“.
“Step 1” will come. Nothing needs to be changed here, you can click “Next“.
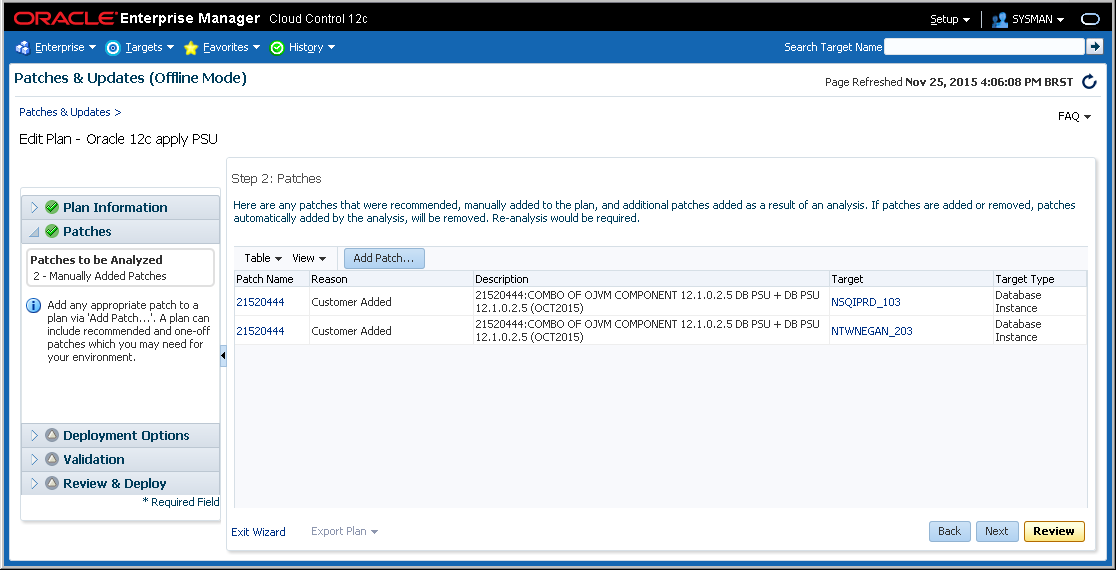
“Step 2” will show you the patches and the DBs you’ve choosed to apply. Check and press “Next“.
“Step 3” is the one that requires more attention. First of all, a PSU is a In Place patch (a patch that does not require a new Oracle Home one to be applied, like the PS’s).
So, change the “How to Patch” to “In Place“.
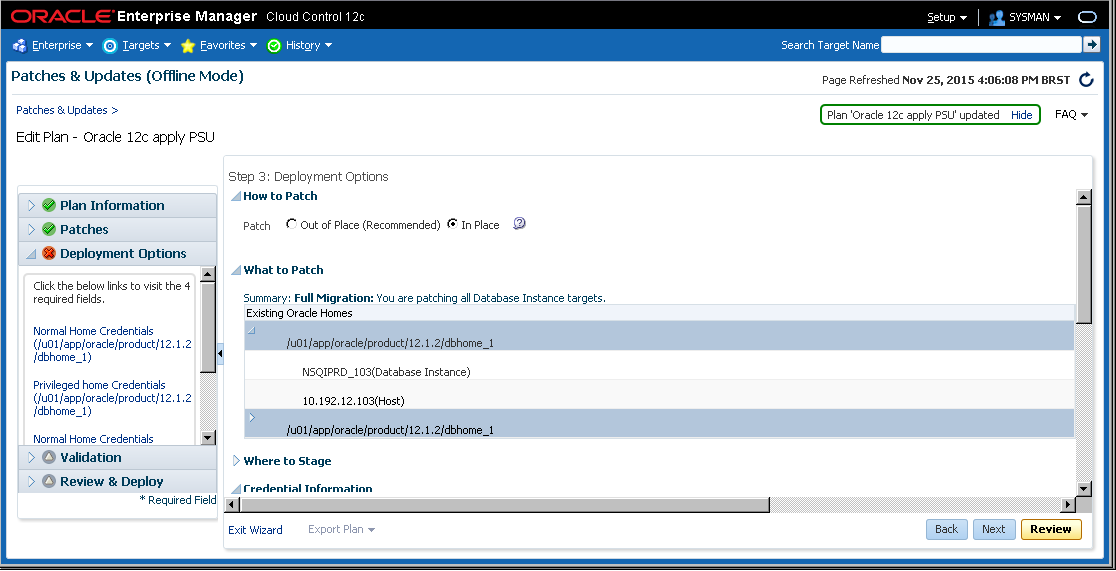
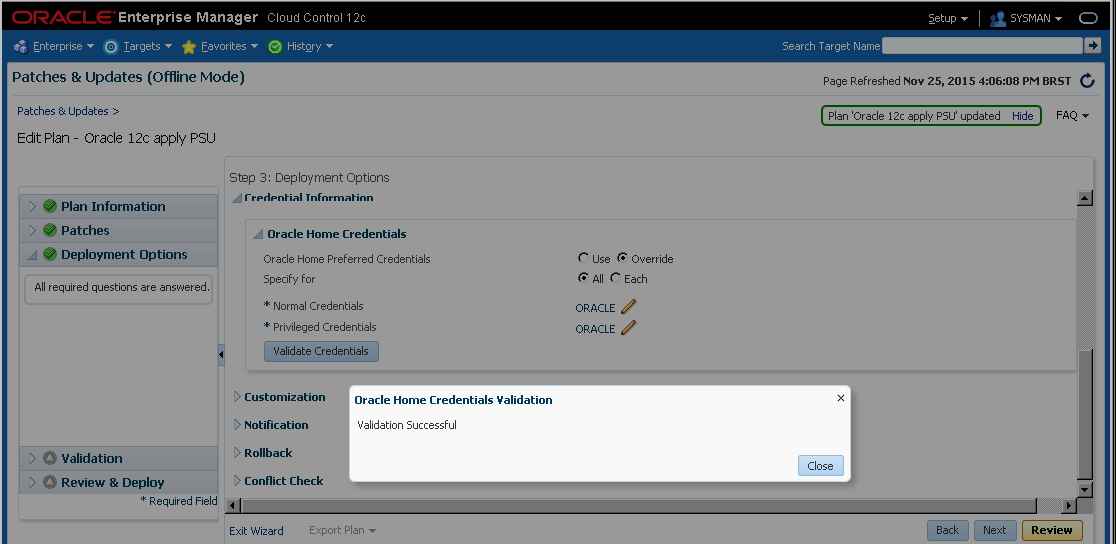
Go down and in “Creadential Information“, fill the “Normal Credentials” and “Privileged Credentials“.
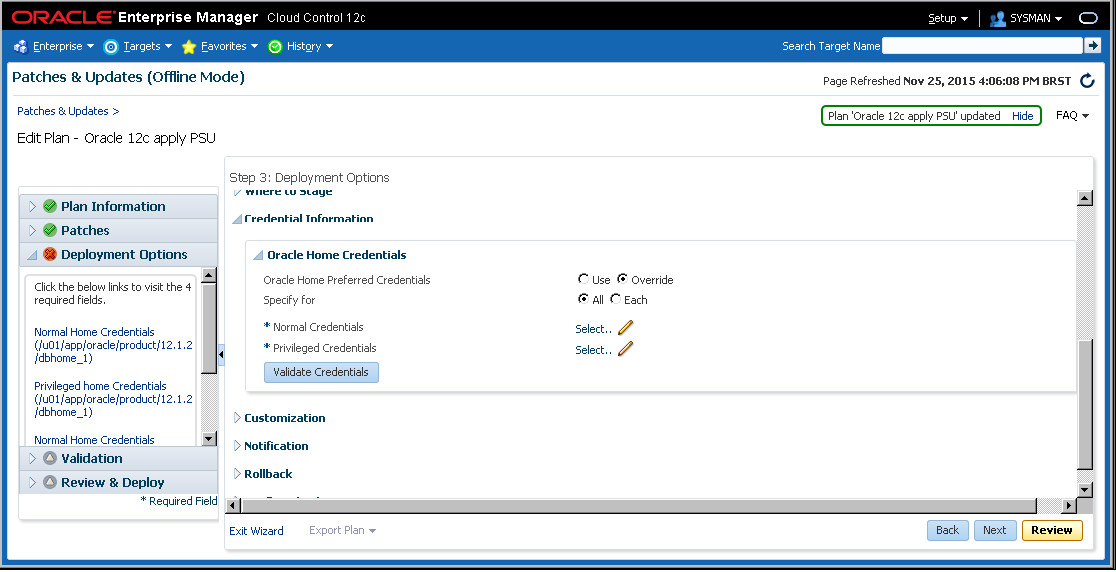
Validate them before continuing.
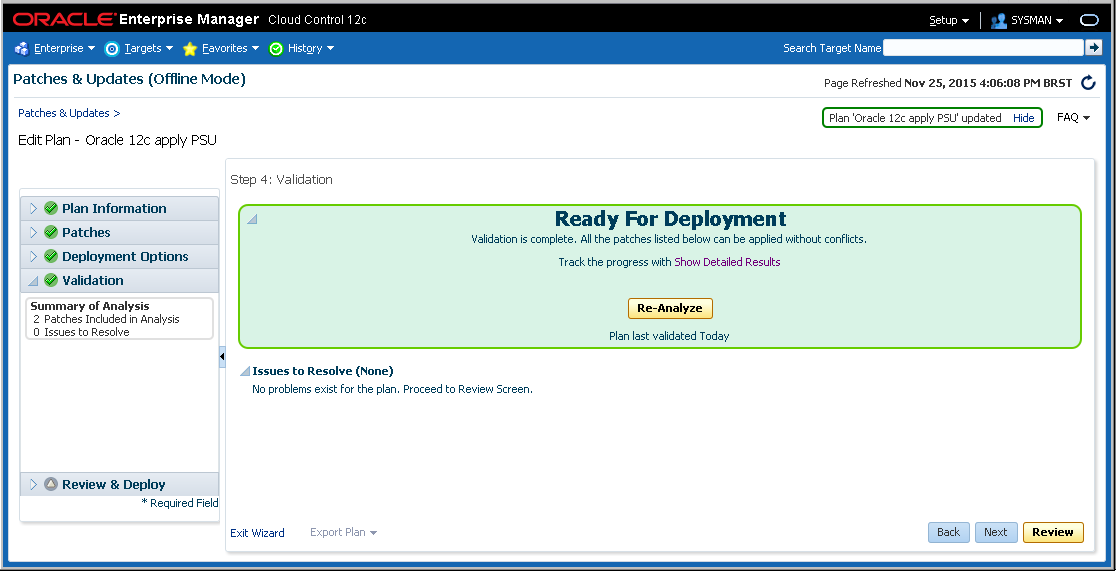
In next Step is time to Validate everything. EM will check the prereqs of the patch for any inconsistency. Click “Analyze“.

Wait a couple of minutes…

When the link “Show Detailed Results” appears, click on it. You can follow the validation steps in a new screen:

If any error appears, verify what happened, correct it and than rerun the validation from the main screen. Note that this will generate a new “Procedure Activity“. Check the process until everything is cleared.
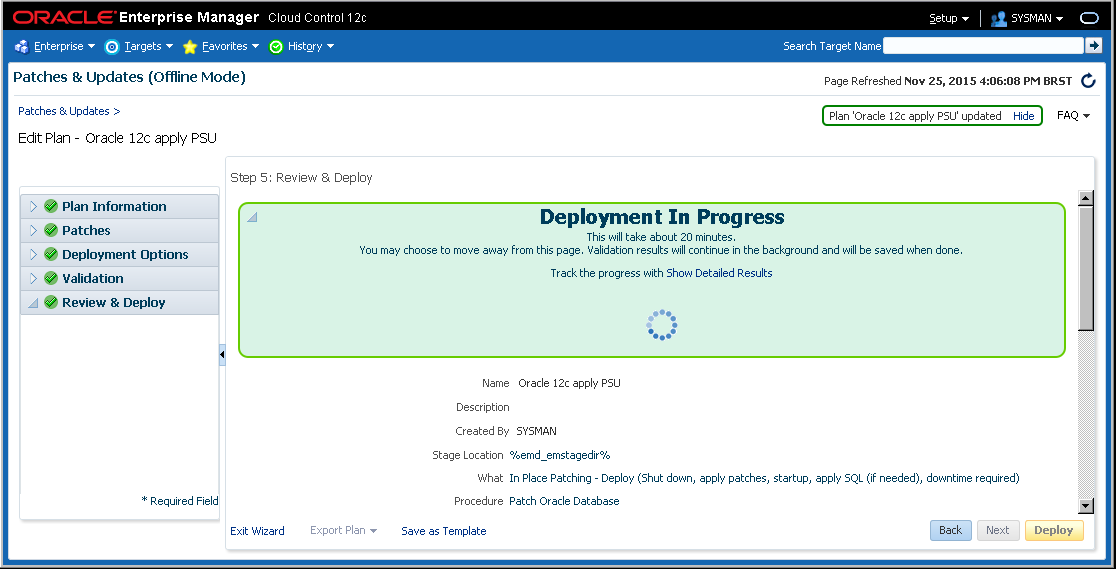
The PSU’s are ready to be deployed! Click “Next“!
Finally, Review and Apply it pressing “Deploy“!
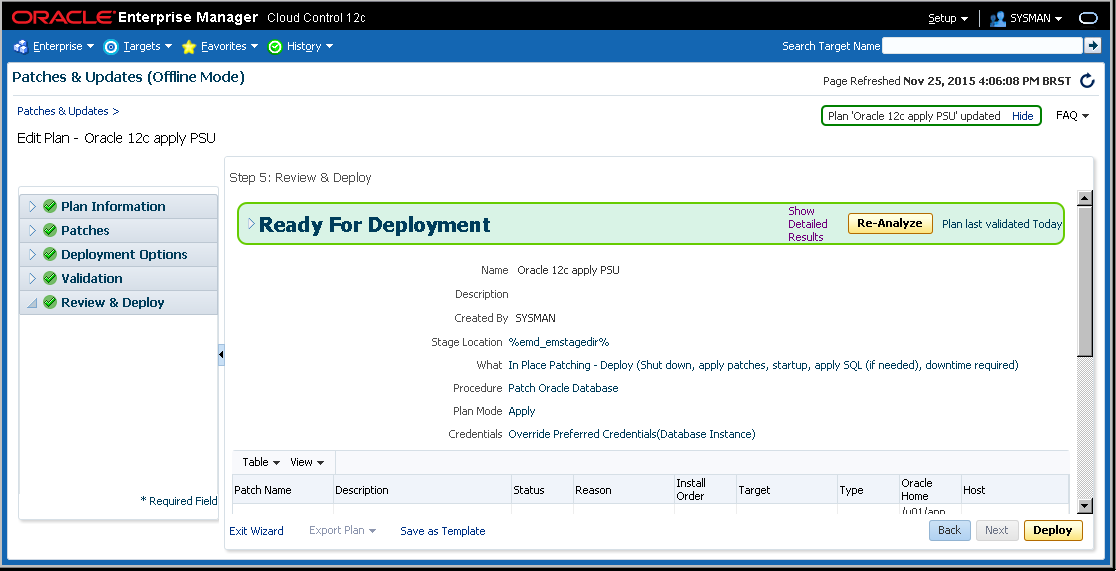
Note that for this PSU, a downtime will be required. You have also the option to schedule it to another scheduled time if is the case.
In my case I’ve already notified the teams and the environment is ready to be brought down. So I simply submit it.

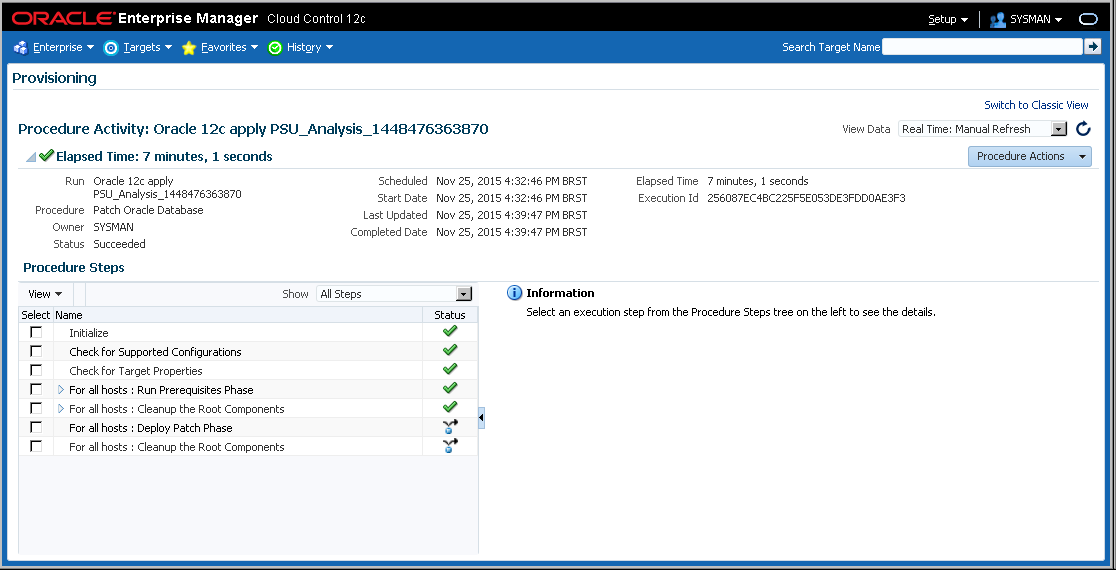
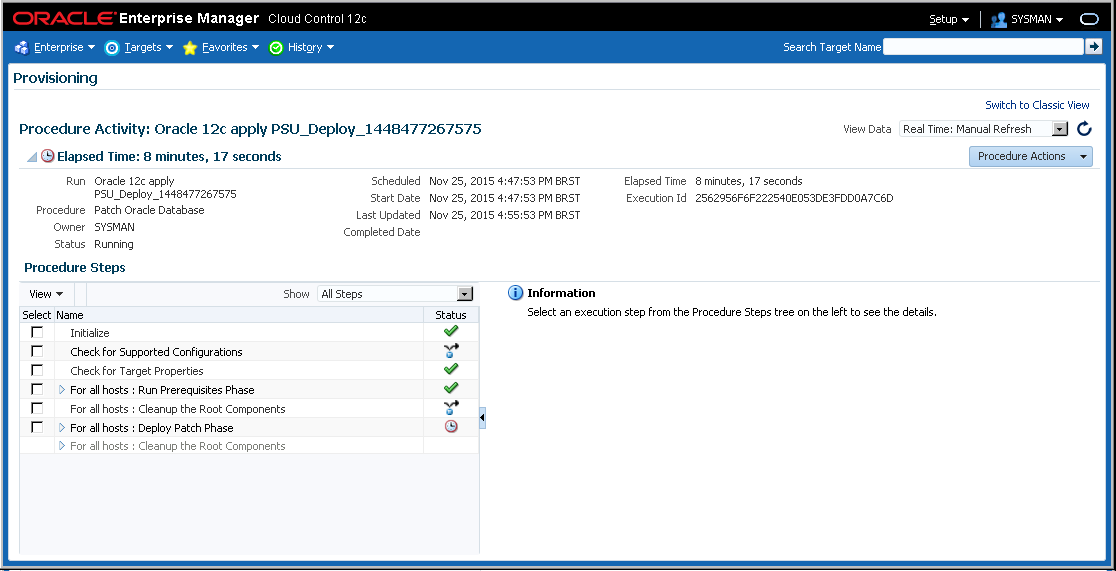
The PSU is being applied. As the deployment is happening, you can also check the steps clicking on “Show Detailed Results“.
Wait until everything is done.
If you receive any error in the deploy phase, do not panic. Just check what happened and correct it.
Then, mark the check-box of the item that failed, go to “Actions -> Retry” and this will rerun the failed item only. So it will continue from where it stopped!
Next, click on the refresh arrow button in that same page and in the main Deployment screen (“Patches & Updates”).
P.S: You can also choose “Ignore” if you prefer to execute that step manually. This will resume the execution starting from next step.
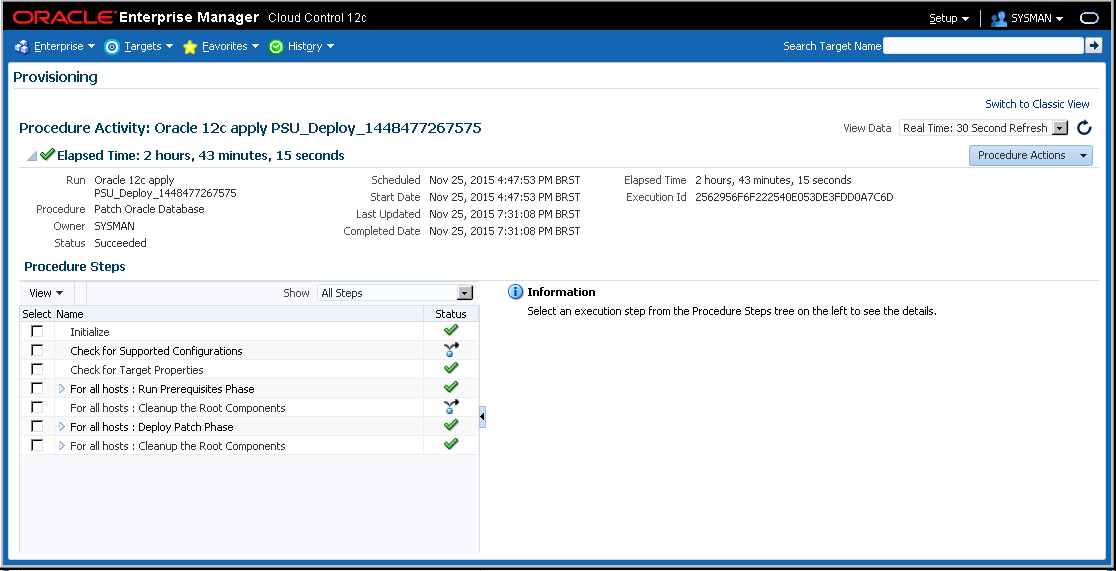
And checking on the main Steps Windows:
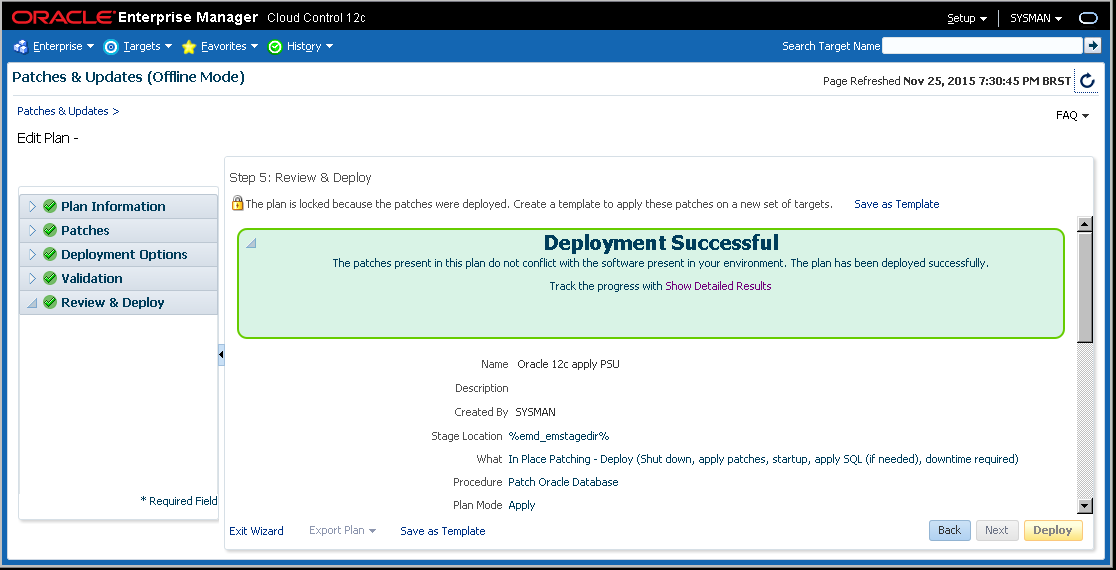
And that’s it, the patch was successful applied!
Upon completion, it’s also recommended to login and check if everything is ok. In my case, I will check if the PSU and the postinstall SQLs were applied.
Checking the PSU:
[oracle@gvncbddsne001 ~]$ $ORACLE_HOME/OPatch/opatch lspatches
21555660;Database PSU 12.1.0.2.5, Oracle JavaVM Component (Oct2015)
21359755;Database Patch Set Update : 12.1.0.2.5 (21359755)

OPatch succeeded.
It’s OK!
Checking “postintall” scripts:
[oracle@gvncbddsne001 ~]$ $ORACLE_HOME/OPatch/datapatch -prereq
SQL Patching tool version 12.1.0.2.0 on Thu Nov 26 12:50:41 2015
Copyright (c) 2015, Oracle.  All rights reserved.

Connecting to database...OK
Note:  Datapatch will only apply or rollback SQL fixes for PDBs
       that are in an open state, no patches will be applied to closed PDBs.
       Please refer to Note: Datapatch: Database 12c Post Patch SQL Automation
       (Doc ID 1585822.1)
Determining current state...done
Adding patches to installation queue and performing prereq checks...done
Installation queue:
  For the following PDBs: CDB$ROOT PDB$SEED NTWNEGAN
    Nothing to roll back
    Nothing to apply

SQL Patching tool complete on Thu Nov 26 12:53:50 2015
[oracle@gvncbddsne001 ~]$
It’s also OK!
So, in this article we’ve seen the application of one PSU in 2 instances in parallel using Enterprise Manager 12c. Remember that’s always good to try first in testing environments to avoid problems or unexpected behavior in production!
Have you enjoyed? Please leave a comment or give a 👍!


8 comments
Skip to comment form
Hi Jorge,
Thanks for sharing in detailed.
I am facing one issue while uploading downloaded patch into OEM.
Getting below error –
Error: The file upload failed
This file could not be uploaded because it is too large (Patch Zip file is having 554.7 MB)
Can you please advise on this.
Author
Try using emcli command to upload the patch and see if that works: https://docs.oracle.com/cd/E24628_01/em.121/e27046/emcli.htm#EMLCM12426
Thanks,
RJ
HI RJ,
could you please tell us how the plan can be cnages instead of RAC databases. whre I need to relocate the services before bringing down the instance and then apply patch on current node rdbms or grid home.
Thanks
JK
Hi,
Go down and in “Creadential Information”, fill the “Normal Credentials” and “Privileged Credentials”.
What should be the Value for both credential ?
I am getting error for creating directory or checks for super user role .
Author
Hi BHavesh,
You should use “SYS” for Privileged and a DBA account for Normal.
Regards,
RJ
Privileged account is SYS & Normal account is DBA account, But it fails for me. DBA account means os level account + sudo permission ? Please confirm. my patching is failing with Run slibclean step.
Cam multiple oracle homes be patched in a single Patch plan?
Thanks Rodrigo!
I was looking everywhere for Oatch’s metadata info. Finally I could upload p6880880 patch.