
This post is also available in:
![]() Português
Português
This tutorial walks you through the process of deploying a MySQL database to Oracle Cloud Infrastructure (OCI) by using Distributed Replicated Block Device (DRBD). DRBD is a distributed replicated storage system for the Linux platform.
PS: This post was based in many other articles that I’ve read over internet and I adapted them for OCI. To avoid having to write from scratch those beautiful definitions of the tools I use here, many statements were simply copied and pasted from those articles. My main source was this one from Google Cloud: https://cloud.google.com/solutions/deploying-highly-available-mysql-cluster-with-drbd-on-compute-engine.
The following diagram describe the proposed architecture:
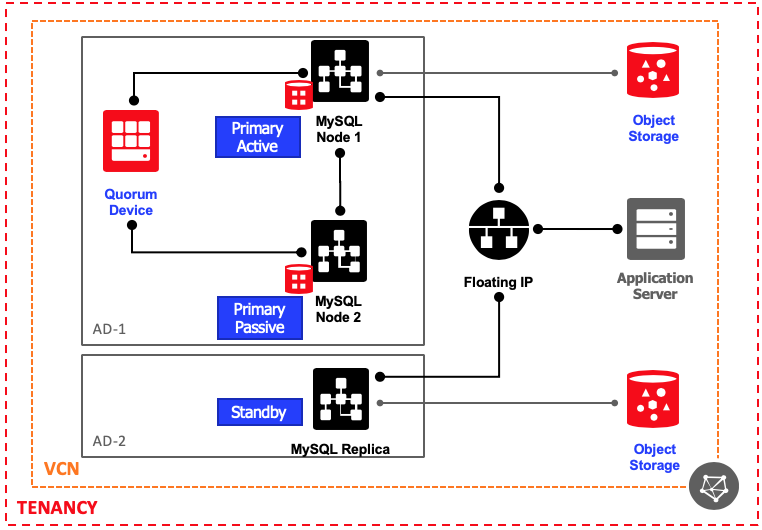
For this first moment, I will only be focusing in building the HA solution (AD-1), where we will have the MySQL Cluster working in Active/Passive mode with a Quorum Server to avoid DRBD Split-brains. In a second moment (another article), I will describe the steps to build the DR solution (AD-2).
Note we are placing all resources from HA in the same AD for better network throughput and lower latency. However, each server will be placed in a different Fault Domain to ensure the HA. The Floating IP will be a secondary IP on the primary VNIC of the compute, moving automatically using OCI-CLI. I’m proposing this over Load Balancer architecture to reduce the costs and complexity. Also, as this is not Active/Active model, LB is not really necessary.
This article uses the following tools:
- Oracle Cloud Resources (Instances, Subnets, VCN, etc)
- DRBD
- Pacemaker
- Corosync Cluster Engine
- Oracle Linux 7
- MySQL 5.7
- OCI-CLI (Oracle Command Line Interface)
Why a Quorum Server?
In a cluster, each node votes for the node that should be the active node—that is, the one that runs MySQL. In a two-node cluster, it takes only one vote to determine the active node. In such a case, the cluster behavior might lead to split-brain issues or downtime. Split-brain issues occur when both nodes take control because only one vote is needed in a two-node scenario. Downtime occurs when the node that shuts down is the one configured to always be the primary in case of connectivity loss. If the two nodes lose connectivity with each other, there’s a risk that more than one cluster node assumes it’s the active node.
How the Cluster works?
Pacemaker is a cluster resource manager. Corosync is a cluster communication and participation package, that’s used by Pacemaker. In this tutorial, you use DRBD to replicate the MySQL disk from the primary instance to the passive instance. In order for clients to connect to the MySQL cluster, you also deploy an internal virtual IP.
You deploy a DRBD cluster on three compute instances. You install MySQL on two of the instances, which serve as your primary and standby instances. The third instance serves as a DRBD quorum device.
Adding a quorum device prevents this situation. A quorum device serves as an arbiter, where its only job is to cast a vote. This way, in a situation where the Active and Passive instances cannot communicate, this quorum device node can communicate with one of the two instances and a majority can still be reached.
Lets Start
Before we begin, some important notes:
- I like SELinux. I prefer to add exceptions or adapt it, but never disabling, specially when the software supports.
- I like iptables and firewalld. Same reasons above.
- People usually don’t like to waste time setting up them and just disable those amazing security tools. If you also don’t know how to deal with them, disable at your own risk. In this article I will describe how to build everything with them enabled.
PS: Important!
When you read:
- [root@ALL]$ – Means commands that must be executed in Quorum Server and MySQL Nodes 1 and 2.
- [root@NODES]$ – Means commands that must be executed in MySQL Nodes 1 and 2.
- [root@NODE_1]$ – Means commands that must be executed in MySQL Node 1 only.
- [root@NODE_2]$ – Means commands that must be executed in MySQL Node 2 only.
- [root@QUORUM]$ – Means commands that must be executed in Quorum Server only.
The following variables must always be declared during the setup, whenever you reboot your instance or sudo to another user:
### FOLLOWING VARIABLES MUST ALWAYS BE DECLARED

INST_MYSQL_N1_IP=10.100.2.11
INST_MYSQL_N2_IP=10.100.2.12
INST_QUORUM_IP=10.100.2.13

# VIRTUAL IP
TARGET_VIP=10.100.2.10

INST_MYSQL_N1_HOST=rj-mysql-node-1
INST_MYSQL_N2_HOST=rj-mysql-node-2
INST_QUORUM_HOST=rj-mysql-quorum
Note that I don’t call a node “primary” and the other “standby” as this role can change very dynamically. So I prefer to number them.
Building your OCI servers
First step is to build your servers. I like to use OCI-CLI for agility but you may also use the web interface. Just adapt the compartment-id, subnet-id, your ssh public key and the display name. For image-id, I’ve used the latest one for Linux 7.6. The Shape can be the minimum one or higher depending on your workload.
Note that each compute must be placed in a different Fault Domain.
$ oci compute instance launch \
--availability-domain FfLG:US-ASHBURN-AD-1 \
--compartment-id ocid1.compartment.oc1..xxx \
--shape VM.Standard.E2.1 \
--display-name RJ_MYSQL_NODE_1 \
--image-id ocid1.image.oc1.iad.xxx \
--metadata '{ "ssh_authorized_keys": "ssh-rsa xxx" }' \
--subnet-id ocid1.subnet.oc1.iad.xxx \
--wait-for-state RUNNING \
--assign-public-ip false \
--private-ip ${INST_MYSQL_N1_IP} \
--fault-domain FAULT-DOMAIN-1 \
--hostname-label ${INST_MYSQL_N1_HOST}

$ oci compute instance launch \
--availability-domain FfLG:US-ASHBURN-AD-1 \
--compartment-id ocid1.compartment.oc1..xxx \
--shape VM.Standard.E2.1 \
--display-name RJ_MYSQL_NODE_2 \
--image-id ocid1.image.oc1.iad.xxx \
--metadata '{ "ssh_authorized_keys": "ssh-rsa xxx" }' \
--subnet-id ocid1.subnet.oc1.iad.xxx \
--wait-for-state RUNNING \
--assign-public-ip false \
--private-ip ${INST_MYSQL_N2_IP} \
--fault-domain FAULT-DOMAIN-2 \
--hostname-label ${INST_MYSQL_N2_HOST}

$ oci compute instance launch \
--availability-domain FfLG:US-ASHBURN-AD-1 \
--compartment-id ocid1.compartment.oc1..xxx \
--shape VM.Standard.E2.1 \
--display-name RJ_MYSQL_QUORUM \
--image-id ocid1.image.oc1.iad.xxx \
--metadata '{ "ssh_authorized_keys": "ssh-rsa xxx" }' \
--subnet-id ocid1.subnet.oc1.iad.xxx \
--wait-for-state RUNNING \
--assign-public-ip false \
--private-ip ${INST_QUORUM_IP} \
--fault-domain FAULT-DOMAIN-3 \
--hostname-label ${INST_QUORUM_HOST}
After computers get created, attach an external block volume in Node 1 and Node 2. They may have the same size. Finally, run your iscsiadm and check if your nodes can detect them:
[root@rj-mysql-node-1 ~]$ lsblk
NAME    MAJ:MIN RM  SIZE RO TYPE MOUNTPOINT
sdb       8:16   0   50G  0 disk
sda       8:0    0 46.6G  0 disk
├─sda2    8:2    0    8G  0 part [SWAP]
├─sda3    8:3    0 38.4G  0 part /
└─sda1    8:1    0  200M  0 part /boot/efi

[root@rj-mysql-node-2 ~]$ lsblk
NAME    MAJ:MIN RM  SIZE RO TYPE MOUNTPOINT
sdb       8:16   0   50G  0 disk
sda       8:0    0 46.6G  0 disk
├─sda2    8:2    0    8G  0 part [SWAP]
├─sda3    8:3    0 38.4G  0 part /
└─sda1    8:1    0  200M  0 part /boot/efi
Connect on all nodes and add all their hostname entries from one in the other:
[root@ALL]$ cat /etc/hosts
127.0.0.1   localhost localhost.localdomain localhost4 localhost4.localdomain4
::1         localhost localhost.localdomain localhost6 localhost6.localdomain6
10.100.2.11 rj-mysql-node-1.demohubrjtestsu.demohub.oraclevcn.com rj-mysql-node-1
10.100.2.12 rj-mysql-node-2.demohubrjtestsu.demohub.oraclevcn.com rj-mysql-node-2
10.100.2.13 rj-mysql-quorum.demohubrjtestsu.demohub.oraclevcn.com rj-mysql-quorum
We are all set. Let’s begin.
Installing MySQL
Connect on Node 1 and Node 2, download and install the latest Community edition.
[root@NODES]$ wget http://repo.mysql.com/yum/mysql-5.7-community/el/7/x86_64/mysql-community-client-5.7.26-1.el7.x86_64.rpm
[root@NODES]$ wget http://repo.mysql.com/yum/mysql-5.7-community/el/7/x86_64/mysql-community-common-5.7.26-1.el7.x86_64.rpm
[root@NODES]$ wget http://repo.mysql.com/yum/mysql-5.7-community/el/7/x86_64/mysql-community-libs-5.7.26-1.el7.x86_64.rpm
[root@NODES]$ wget http://repo.mysql.com/yum/mysql-5.7-community/el/7/x86_64/mysql-community-libs-compat-5.7.26-1.el7.x86_64.rpm
[root@NODES]$ wget http://repo.mysql.com/yum/mysql-5.7-community/el/7/x86_64/mysql-community-server-5.7.26-1.el7.x86_64.rpm

[root@NODES]$ yum -y localinstall mysql-community-*
Disable it (pacemaker will deal with the service) and open the firewall port.
[root@NODES]$ systemctl stop mysqld
[root@NODES]$ systemctl disable mysqld

[root@NODES]$ firewall-cmd --permanent --add-service=mysql
[root@NODES]$ firewall-cmd --reload
Installing DRBD
DRBD 9 is currently still not available on yum repo (from the time of this article). So we will deploy it manually. DRDB 9 is a requirement as it has the quorum capability also on the DRBD layer (not only in corosync), protecting our cluster from some odd cascade scenarios described here: https://docs.linbit.com/docs/users-guide-9.0/#s-configuring-quorum
Run commands below in Node 1, Node 2 and Quorum Server.
# Build the folder structure
[root@ALL]$ cd; mkdir -p rpmbuild/{BUILD,BUILDROOT,RPMS,SOURCES,SPECS,SRPMS}
# Getting RPM Build
[root@ALL]$ yum -y install rpm-build
First compiling DRBD version 9:
[root@ALL]$ yum -y install kernel-uek-devel kernel-devel
[root@ALL]$ wget http://www.linbit.com/downloads/drbd/9.0/drbd-9.0.19-1.tar.gz
[root@ALL]$ tar zxvf drbd-9.0.19-1.tar.gz
[root@ALL]$ cd drbd-9.0.19-1/
[root@ALL]$ make kmp-rpm
[root@ALL]$ cd
Now compiling drbd-utils:
[root@ALL]$ yum -y install flex po4a gcc-c++ automake libxslt docbook-style-xsl
[root@ALL]$ wget http://www.linbit.com/downloads/drbd/utils/drbd-utils-9.10.0.tar.gz
[root@ALL]$ tar zxvf drbd-utils-9.10.0.tar.gz
[root@ALL]$ cd drbd-utils-9.10.0/
Note: We need to add the ‘%undefine with_sbinsymlinks‘ after ‘%bcond_without sbinsymlinks‘ to avoid the self-conflicting file /usr/sbin/drbdadm conflicts (and two others) errors.
[root@ALL]$ sed -i '/%bcond_without sbinsymlinks/a %undefine with_sbinsymlinks' drbd.spec.in
[root@ALL]$ ./configure
[root@ALL]$ make rpm
[root@ALL]$ cd
Now installing only the required packages.
[root@ALL]$ yum -y localinstall /root/rpmbuild/RPMS/x86_64/drbd-utils-9.10.0-1.el7.x86_64.rpm
[root@ALL]$ yum -y localinstall /root/rpmbuild/RPMS/x86_64/drbd-bash-completion-9.10.0-1.el7.x86_64.rpm
[root@ALL]$ yum -y localinstall /root/rpmbuild/RPMS/x86_64/drbd-pacemaker-9.10.0-1.el7.x86_64.rpm
[root@ALL]$ yum -y localinstall /root/rpmbuild/RPMS/x86_64/kmod-drbd-9.0.19_4.14.35_1902.3.1.el7uek.x86_64-1.x86_64.rpm
[root@ALL]$ yum -y localinstall /root/rpmbuild/RPMS/x86_64/drbd-udev-9.10.0-1.el7.x86_64.rpm
As some kernel modules were replaced, to make sure everything is fine, run a reboot. Don’t forget to reload instance IPs and Hosts variables after connecting again.
[root@ALL]$ reboot
Configuring DRBD
Disable DRBD if enabled by default.
[root@ALL]$ systemctl list-unit-files | grep enabled | grep drbd
[root@ALL]$ systemctl disable drbd
Open firewall rules for the cluster HA.
[root@ALL]$ firewall-cmd --permanent --add-port=7788/tcp
[root@ALL]$ firewall-cmd --permanent --add-service=high-availability
[root@ALL]$ firewall-cmd --reload
Changing global_common.conf and adding r0 (the main disk resource):
[root@ALL]$ cp -avn /etc/drbd.d/global_common.conf /etc/drbd.d/global_common.conf.orig
[root@ALL]$ cat <<EOF > /etc/drbd.d/global_common.conf
global {
    usage-count no;
}
common {
    protocol C;
    options {
        quorum majority;
        auto-promote no;
    }
}
EOF

[root@ALL]$ cat <<EOF > /etc/drbd.d/r0.res
resource r0 {
    meta-disk internal;
    device /dev/drbd0;
    net {
        allow-two-primaries no;
        after-sb-0pri discard-zero-changes;
        after-sb-1pri discard-secondary;
        after-sb-2pri disconnect;
        rr-conflict disconnect;
    }
    on ${INST_QUORUM_HOST} {
        node-id 0;
        disk none;
        address ${INST_QUORUM_IP}:7788;
    }
    on ${INST_MYSQL_N1_HOST} {
        node-id 1;
        disk /dev/sdb;
        address ${INST_MYSQL_N1_IP}:7788;
    }
    on ${INST_MYSQL_N2_HOST} {
        node-id 2;
        disk /dev/sdb;
        address ${INST_MYSQL_N2_IP}:7788;
    }
    connection-mesh {
        hosts ${INST_MYSQL_N1_HOST} ${INST_MYSQL_N2_HOST} ${INST_QUORUM_HOST};
    }
    handlers {
        quorum-lost "echo b > /proc/sysrq-trigger";
    }
}
EOF
Allowing DRBD on SELinux:
[root@ALL]$ semanage permissive -a drbd_t
Let the service auto-start on Quorum server only. On the other nodes it will be managed by pacemaker:
[root@QUORUM]$ systemctl enable drbd
Prepare disks on Node 1 and Node 2:
[root@NODES]$ mkfs.ext4 -m 0 -F -E lazy_itable_init=0,lazy_journal_init=0,discard /dev/sdb
[root@NODES]$ dd if=/dev/zero of=/dev/sdb bs=1k count=1024
[root@NODES]$ drbdadm create-md r0
Bring the resource up in all of them:
[root@ALL]$ drbdadm up r0
Tell Node 1 he has the Primary data:
[root@NODE_1]$ drbdadm primary r0 --force
[root@NODE_1]$ drbdadm -- --overwrite-data-of-peer primary r0
[root@NODE_1]$ mkfs.ext4 -m 0 -F -E lazy_itable_init=0,lazy_journal_init=0,discard /dev/drbd0
You may check the status running the commands below:
[root@ALL]$ drbdmon
[root@ALL]$ cat /sys/kernel/debug/drbd/resources/r0/connections/*/0/proc_drbd
Configuring MySQL
We are going to hold MySQL database, tmp files and config in /u01/. Let’s prepare it in both nodes:
[root@NODES]$ mkdir /u01
[root@NODES]$ semanage fcontext -a -e /var/lib/mysql /u01/mysql
[root@NODES]$ semanage fcontext -a -t tmp_t /u01/tmp
[root@NODES]$ semanage fcontext -a -t mysqld_etc_t /u01/my.cnf
Let’s remove old config and database files and point to new ones (that we will create later):
[root@NODES]$ rm -rf /var/lib/mysql
[root@NODES]$ ln -s /u01/mysql /var/lib/mysql

[root@NODES]$ rm -f /etc/my.cnf
[root@NODES]$ ln -s /u01/my.cnf /etc/my.cnf
Now on Node 1 (our current primary), mount the disk and create the folders:
[root@NODE_1]$ mount -o discard,defaults /dev/drbd0 /u01

[root@NODE_1]$ chown mysql: /u01
[root@NODE_1]$ mkdir /u01/tmp
[root@NODE_1]$ chmod 1777 /u01/tmp
[root@NODE_1]$ restorecon -v /u01/tmp

[root@NODE_1]$ mkdir /u01/mysql
[root@NODE_1]$ chown mysql: /u01/mysql

[root@NODE_1]$ cat <<EOF > /u01/my.cnf
[mysqld]
bind-address = 0.0.0.0  # You may want to listen at localhost at the beginning
datadir = /u01/mysql
tmpdir = /u01/tmp
socket=/var/run/mysqld/mysql.sock
user = mysql
symbolic-links=0
log-error=/var/log/mysqld.log
pid-file=/var/run/mysqld/mysqld.pid
EOF

[root@NODE_1]$ chown mysql: /u01/my.cnf
[root@NODE_1]$ restorecon -v /u01/my.cnf
Start and stop the service to create the initial files. If you have any problem starting it, check for ‘success=no’ in audit.log and also the mysqld.log for issues..
[root@NODE_1]$ systemctl start mysqld
[root@NODE_1]$ ls -la /u01/mysql/
[root@NODE_1]$ systemctl stop mysqld
Installing and Configuring Pacemaker, Corosync and PCSD
On both nodes, install the following tools:
[root@NODES]$ yum -y install pcs pacemaker corosync
[root@NODES]$ systemctl enable pcsd
[root@NODES]$ systemctl enable pacemaker
[root@NODES]$ systemctl enable corosync
Set a common password for hacluster user on the node servers:
[root@NODES]$ echo 'hsh918hs8fah89fh198fh' | passwd --stdin hacluster
In Node 1, create the corosync key and share it with node 2:
[root@NODE_1]$ corosync-keygen -l
[root@NODE_1]$ cp -av /etc/corosync/authkey /home/opc/authkey
[root@NODE_1]$ chown opc: /home/opc/authkey

[YOUR_HOST]$ scp -p -3 opc@${INST_MYSQL_N1_IP}:/home/opc/authkey opc@${INST_MYSQL_N2_IP}:/home/opc/authkey

[root@NODE_1]$ rm -f /home/opc/authkey

[root@NODE_2]$ mv /home/opc/authkey /etc/corosync/authkey
[root@NODE_2]$ chown root: /etc/corosync/authkey
Set corosync.conf for both nodes. In Node 2, we need to adapt Bindnetaddr to his IP address.
[root@NODES]$ cat <<EOF  > /etc/corosync/corosync.conf
totem {
    version: 2
    cluster_name: mysql_cluster
    transport: udpu
    interface {
        ringnumber: 0
        Bindnetaddr: ${INST_MYSQL_N1_IP}
        broadcast: yes
        mcastport: 5405
    }
}
quorum {
    provider: corosync_votequorum
    two_node: 1
}
nodelist {
    node {
        ring0_addr: ${INST_MYSQL_N1_HOST}
        name:  ${INST_MYSQL_N1_HOST}
        nodeid: 1
    }
    node {
        ring0_addr:  ${INST_MYSQL_N2_HOST}
        name:  ${INST_MYSQL_N2_HOST}
        nodeid: 2
    }
}
logging {
    to_logfile: yes
    logfile: /var/log/corosync/corosync.log
    timestamp: on
}
EOF

# On Node 2 only
[root@NODE_2]$ sed -i "s/${INST_MYSQL_N1_IP}/${INST_MYSQL_N2_IP}/" /etc/corosync/corosync.conf
On both nodes, adding pacemaker to corosync:
[root@NODES]$ mkdir /etc/corosync/service.d/
[root@NODES]$ cat <<EOF  > /etc/corosync/service.d/pcmk
service {
    name: pacemaker
    ver: 1
}
EOF
Adding some corosync variables to the config file:
[root@NODES]$ cp -avn /etc/sysconfig/corosync /etc/sysconfig/corosync.orig
[root@NODES]$ cat <<EOF >> /etc/sysconfig/corosync

# Path to corosync.conf
COROSYNC_MAIN_CONFIG_FILE=/etc/corosync/corosync.conf
# Path to authfile
COROSYNC_TOTEM_AUTHKEY_FILE=/etc/corosync/authkey
# Enable service by default
START=yes
EOF
Create a folder for corosync logs, start the service and check if you can see both members:
[root@NODES]$ mkdir /var/log/corosync/
[root@NODES]$ systemctl start corosync
[root@NODES]$ corosync-cmapctl | grep members
Create the pacamaker script below to have a better logging and auto cleanup of your in case of cancelled actions:
[root@NODES]$ cat << 'EOF'  > /var/lib/pacemaker/drbd_cleanup.sh
#!/bin/sh
if [ -z $CRM_alert_version ]; then
    echo "$0 must be run by Pacemaker version 1.1.15 or later"
    exit 0
fi

tstamp="$CRM_alert_timestamp: "

case $CRM_alert_kind in
    resource)
        if [ ${CRM_alert_interval} = "0" ]; then
            CRM_alert_interval=""
        else
            CRM_alert_interval=" (${CRM_alert_interval})"
        fi

        if [ ${CRM_alert_target_rc} = "0" ]; then
            CRM_alert_target_rc=""
        else
            CRM_alert_target_rc=" (target: ${CRM_alert_target_rc})"
        fi

        case ${CRM_alert_desc} in
            Cancelled) ;;
            *)
                echo "${tstamp}Resource operation "${CRM_alert_task}${CRM_alert_interval}" for "${CRM_alert_rsc}" on "${CRM_alert_node}": ${CRM_alert_desc}${CRM_alert_target_rc}" >> "${CRM_alert_recipient}"
                if [ "${CRM_alert_task}" = "stop" ] && [ "${CRM_alert_desc}" = "Timed Out" ]; then
                    echo "Executing recovering..." >> "${CRM_alert_recipient}"
                    pcs resource cleanup ${CRM_alert_rsc}
                fi
                ;;
        esac
        ;;
    *)
        echo "${tstamp}Unhandled $CRM_alert_kind alert" >> "${CRM_alert_recipient}"
        env | grep CRM_alert >> "${CRM_alert_recipient}"
        ;;
esac
EOF

[root@NODES]$ chmod 0755 /var/lib/pacemaker/drbd_cleanup.sh
[root@NODES]$ touch /var/log/pacemaker_drbd_file.log
[root@NODES]$ chown hacluster:haclient /var/log/pacemaker_drbd_file.log
Configuring PCSD
Ensure PCSD service is started on all the servers:
[root@NODES]$ systemctl start pcsd.service
Now let’s setup our cluster resources. We will do all the setup from Node 1 only. First, authenticate from Node 1 in Node 2:
[root@NODE_1]$ pcs cluster auth --name mysql_cluster ${INST_MYSQL_N1_HOST} ${INST_MYSQL_N2_HOST} -u hacluster
Now it’s time to set our resources. What the code below is doing:
- The DRBD service will be named mysql_drbd.
- The /u01 mount point will be named mystore_fs.
- The MySQL database will be named mysql_database.
- Defining the DRBD as multi-state (Master/Slave).
- mystore_fs can only start if mysql_drbd is Master in that node.
- The start order is defined to mysql_drbd -> mystore_fs -> mysql_database
[root@NODE_1]$ pcs cluster start --all
[root@NODE_1]$ pcs status
[root@NODE_1]$ pcs cluster cib mysql_cfg
[root@NODE_1]$ pcs -f mysql_cfg property set stonith-enabled=false
[root@NODE_1]$ pcs -f mysql_cfg property set no-quorum-policy=stop
[root@NODE_1]$ pcs -f mysql_cfg resource defaults resource-stickiness=200
[root@NODE_1]$ pcs -f mysql_cfg resource create mysql_drbd ocf:linbit:drbd \
    drbd_resource=r0 \
    op monitor role=Master interval=29 timeout=20 \
    op monitor role=Slave interval=31 timeout=20 \
    op start timeout=120 \
    op stop timeout=60
[root@NODE_1]$ pcs -f mysql_cfg resource master mysql_primary mysql_drbd \
    master-max=1 master-node-max=1 \
    clone-max=2 clone-node-max=1 \
    notify=true
[root@NODE_1]$ pcs -f mysql_cfg resource create mystore_fs Filesystem \
    device="/dev/drbd0" \
    directory="/u01" \
    fstype="ext4"
[root@NODE_1]$ pcs -f mysql_cfg constraint colocation add mystore_fs with mysql_primary INFINITY with-rsc-role=Master
[root@NODE_1]$ pcs -f mysql_cfg constraint order promote mysql_primary then start mystore_fs
[root@NODE_1]$ pcs -f mysql_cfg resource create mysql_database ocf:heartbeat:mysql \
    binary="/usr/sbin/mysqld" \
    config="/u01/my.cnf" \
    datadir="/u01/mysql" \
    pid="/var/run/mysqld/mysql.pid" \
    socket="/var/run/mysqld/mysql.sock" \
    additional_parameters="--bind-address=0.0.0.0" \
    op start timeout=60s \
    op stop timeout=60s \
    op monitor interval=20s timeout=30s
[root@NODE_1]$ pcs -f mysql_cfg constraint colocation add mysql_database with mystore_fs INFINITY
[root@NODE_1]$ pcs -f mysql_cfg constraint order mystore_fs then mysql_database
[root@NODE_1]$ pcs -f mysql_cfg alert create id=drbd_cleanup_file description="Monitor DRBD events and perform post cleanup" path=/var/lib/pacemaker/drbd_cleanup.sh
[root@NODE_1]$ pcs -f mysql_cfg alert recipient add drbd_cleanup_file id=logfile value=/var/log/pacemaker_drbd_file.log
[root@NODE_1]$ pcs cluster cib-push mysql_cfg
[root@NODE_1]$ pcs status
Now check if mysql database has started. If it fails to do so, check for ‘success=no’ in audit.log and also the mysqld.log for issues.
Configuring OCI-CLI
The OCI-CLI utility included in this build and will be responsible for moving a secondary IP from one VNIC to the other. The user account who is going to execute oci-cli will be hacluster. So we are going to deploy it in /home/oracle-cli/ and give the proper permissions:
[root@NODES]$ mkdir /home/oracle-cli/
[root@NODES]$ chown root: /home/oracle-cli/
[root@NODES]$ chmod 755 /home/oracle-cli/

[root@NODES]$ wget https://raw.githubusercontent.com/oracle/oci-cli/master/scripts/install/install.sh
[root@NODES]$ bash install.sh --accept-all-defaults --exec-dir /home/oracle-cli/bin/ --install-dir /home/oracle-cli/lib/

[root@NODES]$ rm -f install.sh
[root@NODES]$ rm -rf /root/bin/oci-cli-scripts

[root@NODES]$ mkdir /home/oracle-cli/.oci
[root@NODES]$ chown hacluster:haclient /home/oracle-cli/.oci
[root@NODES]$ chmod 700 /home/oracle-cli/.oci
Now it’s time to configure it. There are 2 ways you can make oci-cli calls to the tenancy:
Option A – Creating a new User in your OCI Tenancy
One option is to create a user to perform this API activity with the minimum required privileges.
- Create a new user in your OCI tenancy. Eg: rj-mysql-user-change-vip
- Create a new group and add the user to the group: Eg: rj-mysql-group-change-vip
- Create a new policy and add only the minimal privilege required: Eg: rj-mysql-policy-change-vip
- Allow group rj-mysql-group-change-vip to use private-ips in compartment ABC
- Allow group rj-mysql-group-change-vip to use vnics in compartment ABC
After the user is setup, proceed with the oci-cli configuration:
[root@NODE_1]$ sudo -u hacluster /home/oracle-cli/bin/oci setup config

# Answers:
# /home/oracle-cli/.oci/config
# ocid1.user.oc1..xxx (Your user OCID)
# ocid1.tenancy.oc1..xxx (Your tenancy OCID)
# us-ashburn-1 (Your region)
# Y
# /home/oracle-cli/.oci
# oci_api_key
# f1k10k0fk10k1f (Create a random password, just to give an extra security to your Priv Key)
# f1k10k0fk10k1f (Retype it)
# Y
Finally, copy and paste the generated public key /home/oracle-cli/.oci/oci_api_key_public.pem in the API Keys section of your new user.
Option B – Creating a Dynamic Group in your OCI Tenancy
The second option is to authorise your compute instance to make direct REST calls to the OCI using dynamic groups.
- Create a new dynamic group in your OCI tenancy with the following rules. Eg: rj-mysql-dyngroup-change-vip
-
instance.id = ‘ocid1.instance.oc1.iad.xxxx’ (replace with your Node 1 OCID)
-
instance.id = ‘ocid1.instance.oc1.iad.yyyy’ (replace with your Node 2 OCID)
-
- Create a new policy and add only the minimal privilege required. Eg: rj-mysql-policy-change-vip
- Allow group rj-mysql-group-change-vip to use private-ips in compartment ABC
- Allow group rj-mysql-group-change-vip to use vnics in compartment ABC
After the dynamic group is setup, proceed with the oci-cli configuration (adapt with your tenancy OCID):
[root@NODE_1]$ cat << EOF > /home/oracle-cli/.oci/config
[DEFAULT]
tenancy=ocid1.tenancy.oc1..xxx
region=us-ashburn-1
EOF

[root@NODE_1]$ chmod 600 /home/oracle-cli/.oci/config
[root@NODE_1]$ chown -R hacluster:haclient /home/oracle-cli/.oci/
OCI-CLI Test
Now that you have already decided either Option A or Option B, let’s proceed with the last configuration steps.
Copy the .oci config folder to the other node:
[root@NODE_1]$ cp -ar /home/oracle-cli/.oci/ /home/opc/.oci/
[root@NODE_1]$ chown -R opc: /home/opc/.oci/

[YOUR_HOST]$ scp -r -p -3 opc@${INST_MYSQL_N1_IP}:/home/opc/.oci/ opc@${INST_MYSQL_N2_IP}:/home/opc/.oci/

[root@NODE_1]$ rm -rf /home/opc/.oci/

[root@NODE_2]$ mv /home/opc/.oci/ /home/oracle-cli/
[root@NODE_2]$ chown -R hacluster:haclient /home/oracle-cli/.oci/
Finally, create a script to perform the Virtual IP move and give the proper permissions on both nodes:
PS: Change node1vnic and node2vnic variables with the right OCID of the primary VNICs of your nodes.
[root@NODES]$ cat << EOF  > /home/oracle-cli/move_secip.sh
#!/bin/sh
##### OCI vNIC variables
ocibin="/home/oracle-cli/bin/oci"
configfile="/home/oracle-cli/.oci/config"
server="\$(hostname -s)"
node1vnic="ocid1.vnic.oc1.iad.xxxx"
node2vnic="ocid1.vnic.oc1.iad.yyyy"
vnicip="${TARGET_VIP}"
##### OCI/IPaddr Integration
if [ "\${server}" = "${INST_MYSQL_N1_HOST}" ]
then
   \${ocibin} --config-file \${configfile} network vnic assign-private-ip --unassign-if-already-assigned --vnic-id \${node1vnic} --ip-address \${vnicip}
else
   \${ocibin} --config-file \${configfile} network vnic assign-private-ip --unassign-if-already-assigned --vnic-id \${node2vnic} --ip-address \${vnicip}
fi
EOF

[root@NODES]$ chmod +x /home/oracle-cli/move_secip.sh
[root@NODES]$ chmod 700 /home/oracle-cli/move_secip.sh
[root@NODES]$ chown hacluster:haclient /home/oracle-cli/move_secip.sh
Before testing this script, if you followed this article and gave the minimum required privileges in your policy (use private-ips and use vnics), those privileges will allow you move the Private IP from one node to the other, but not to create the private IP initially. So, first assign the IP manually using your OCI web-console with a privileged user to any of the nodes. Then you can test if the IPs will move:
[root@NODE_1]$ /home/oracle-cli/move_secip.sh # Will move Virtual IP to Node 1
[root@NODE_2]$ /home/oracle-cli/move_secip.sh # Will move Virtual IP to Node 2
Adding VIP script to PCSD
Our last step before testing is adding this script call to our configuration.
First we create another script on both nodes that will call our move_secip.sh in some specific conditions:
[root@NODES]$ cat << 'EOF'  > /var/lib/pacemaker/ip_move.sh
#!/bin/sh
if [ -z $CRM_alert_version ]; then
    echo "$0 must be run by Pacemaker version 1.1.15 or later"
    exit 0
fi

if [ "${CRM_alert_kind}" = "resource" -a "${CRM_alert_target_rc}" = "0" -a "${CRM_alert_task}" = "start" -a "${CRM_alert_rsc}" = "mysql_VIP" ]
then
    tstamp="$CRM_alert_timestamp: "
    echo "${tstamp}Moving IP" >> "${CRM_alert_recipient}"
    /home/oracle-cli/move_secip.sh >> "${CRM_alert_recipient}" 2>> "${CRM_alert_recipient}"
fi
EOF

[root@NODES]$ chmod 0755 /var/lib/pacemaker/ip_move.sh

[root@NODES]$ touch /var/log/pacemaker_ip_move.log
[root@NODES]$ chown hacluster:haclient /var/log/pacemaker_ip_move.log
Finally, connect on Node 1 and add the ip_move.sh as a triggered alert:
[root@NODE_1]$ pcs cluster cib mysql_cfg
[root@NODE_1]$ pcs -f mysql_cfg resource create mysql_VIP ocf:heartbeat:IPaddr2 ip=${TARGET_VIP} cidr_netmask=28 op monitor interval=20s
[root@NODE_1]$ pcs -f mysql_cfg alert create id=ip_move description="Move IP address using oci-cli" path=/var/lib/pacemaker/ip_move.sh
[root@NODE_1]$ pcs -f mysql_cfg alert recipient add ip_move id=logfile_ip_move value=/var/log/pacemaker_ip_move.log
[root@NODE_1]$ pcs -f mysql_cfg constraint colocation add mysql_VIP with mysql_database INFINITY
[root@NODE_1]$ pcs -f mysql_cfg constraint order mysql_database then mysql_VIP
[root@NODE_1]$ pcs cluster cib-push mysql_cfg
Testing the HA architecture
Finally, our last step is to test everything we have built so far.
You can start/stop the cluster on both nodes and check the resources moving using:
[root@NODE_1]$ pcs cluster stop
[root@NODE_1]$ pcs cluster start
[root@NODE_2]$ pcs cluster stop
[root@NODE_2]$ pcs cluster start
Or you can trigger a resource move:
[ANY_NODE]$ pcs resource move --master mysql_primary rj-mysql-node-1
[ANY_NODE]$ pcs resource clear mysql_primary
Below are the timings I could measure with the building above:
Failure Scenarios
Time to test the auto-failover. The following commands were executed in each test:
- Soft Stop -> $ reboot (Services were disabled for no auto-start)
- Hard Stop -> $ echo b > /proc/sysrq-trigger (Services were disabled for no auto-start)
- Network Isolation:
- $ iptables -I INPUT 1 -s 10.100.2.X/32 -j DROP; iptables -I INPUT 1 -d 10.100.2.X/32 -j DROP;
- $ firewall-cmd –reload (To clear the 2 rules above and re-establish the communication)
For every scenario, the current configuration is:
- Node 1 is Active Primary.
- Node 2 is Passive Primary.
- Node 2 soft stop -> Nothing changes. Node 2 will tell node 1 it is leaving the cluster and node 1 will still be the primary with no delay as it still has quorum.
- Node 2 hard stop -> IO in node 1 freezes for about 10 secs. Node 2 won’t tell node 1 it is shutting down, so node 1 will wait for a while until he declares node 2 is not in sync anymore.
- Node 1 soft stop -> Node 2 will be our new Primary with all services up after 20 secs. Node 1 will tell node 2 it is leaving the cluster and node 2 will be the converted into your new primary.
- Node 1 hard stop -> Node 2 will be our new Primary with all services up after 50 secs. Node 1 won’t tell node 2 it is shutting down and node 2 will be the converted into primary after a timeout as it has now the quorum.
- Quorum Server soft/hard stop -> Nothing changes. Node 1 will continue to be your primary and node 2, the standby.
- Node 1 gets isolated -> Transactions in node 1 will be suspended. Node 2 will be our new Primary with all services up after 20 secs. As node 1 cannot talk to neither node 2 nor the tiebreaker node, it lost quorum to continue the operation and will be rebooted. Node 2 will be our new primary after about 20 secs.
- Node 2 gets isolated -> Same as “Node 2 hard stop”.
- Quorum Server gets isolated -> Same as “Quorum Server hard stop“.
- Node 1 and node 2 connection is broken -> IO in node 1 freezes for about 10 secs. Both nodes will try to get the quorum to become the new primary. However, the tiebreaker server will tell Node 2 he is Outdated. PCS will try to start the service on Node 2, but DRBD won’t allow it with the Outdated flag.
- Node 2 and Quorum Server connection is broken -> Nothing changes. Node 1 will continue to be your primary and node 2, the standby.
- Node 1 and Quorum Server connection is broken -> Nothing changes. Node 1 will continue to be your primary and node 2, the standby.
Imagine now this scenario:
- A is Node 1 – Primary
- B is Node 2 – Standby
- C is the Quorum Server

Node 2 suddenly gets isolated. In this case, the tiebreaker node forms a partition with the primary node. The primary therefore keeps quorum, while the secondary becomes outdated. Note that the secondary compute doesn’t know he is outdated. His state will still be “UpToDate“, but regardless it cannot be promoted to primary because it lacks quorum.
The application is still running on the primary. However, after some time of production execution, node 1 gets suddenly isolated and a bit later node 2 is back to the cluster. Note that now node 2 would have quorum and with the status UpToDate, it could become primary again. This would result in data loss. However, this can’t happen because a node that has lost quorum cannot regain quorum by connecting to a diskless node. Thus, in this case, no node has quorum and the cluster halts. We are safe. =]
rj-mysql-node-2 kernel: drbd r0: 1 of 2 nodes visible, need 2 for quorum

rj-mysql-node-2 kernel: drbd r0: State change failed: No quorum

rj-mysql-node-2 kernel: drbd r0: Failed: role( Secondary -> Primary )

rj-mysql-node-2 drbd(mysql_drbd)[15728]: ERROR: r0: Called drbdadm -c /etc/drbd.conf primary r0

rj-mysql-node-2 drbd(mysql_drbd)[15728]: ERROR: r0: Exit code 11
And the scenario above is the main reason I’m using DRBD 9 instead of DRBD 8 for my cluster. With DRBD 9, my tiebreaker server will be a DRBD quorum disk. The Corosync quorum device don’t have this kind of intelligence as the DRBD quorum has and wouldn’t allow us to avoid this odd scenario.
Hope you enjoyed. Soon I will write another article how to add the MySQL Replica DR into this configuration.
Some useful links:
- https://docs.linbit.com/docs/users-guide-9.0/#s-configuring-quorum
- https://www.tecmint.com/setup-drbd-storage-replication-on-centos-7/
- https://docs.linbit.com/man/v9/drbd-conf-5/
- https://www.linbit.com/en/cheap-votes-drbd-diskless-quorum/
- https://docs.linbit.com/docs/users-guide-8.3/p-performance/
- https://www.lisenet.com/2016/activepassive-mysql-high-availability-pacemaker-cluster-with-drbd-on-centos-7/


2 comments
Hi, thanks for this nice howto, and discussion of how things work in case something fails!
Just a cosmetic suggestion on your DRBD config. Since you have quorum enabled the
after-sb-0pri discard-zero-changes;
after-sb-1pri discard-secondary;
after-sb-2pri disconnect;
rr-conflict disconnect;
are pointless. They are only relevant when you operate the DRBD cluster in a
way that you expect split-brain situations. As allow-two-primaries no; is the default,
you could drop the net section.
Author
True. When I build it I initially started with 2 nodes only until I finally added the quorum. Thanks =]