
In this article I will describe the steps you need to take if you want to create an account in your Oracle Cloud with read-only access to your oracle cloud billing information. Please note this article was written on June-2019, and as Oracle is introducing new-features and changing the look n’ feel of the pages constantly, some options may have changed.
First, let’s give a brief introduction about IDCS. There are basically 2 ways you can connect to your Oracle Cloud: using a user account or an application account. In IDCS, if you choose to create a user account to get the billing information, you will need to use roles to restrict the scope access of the account, and there is where the first problem comes up: the roles are not very specific.
For now, the only role that give privileges to access the billing is the “Cloud Account Administrator“, which is like root for Oracle Cloud:
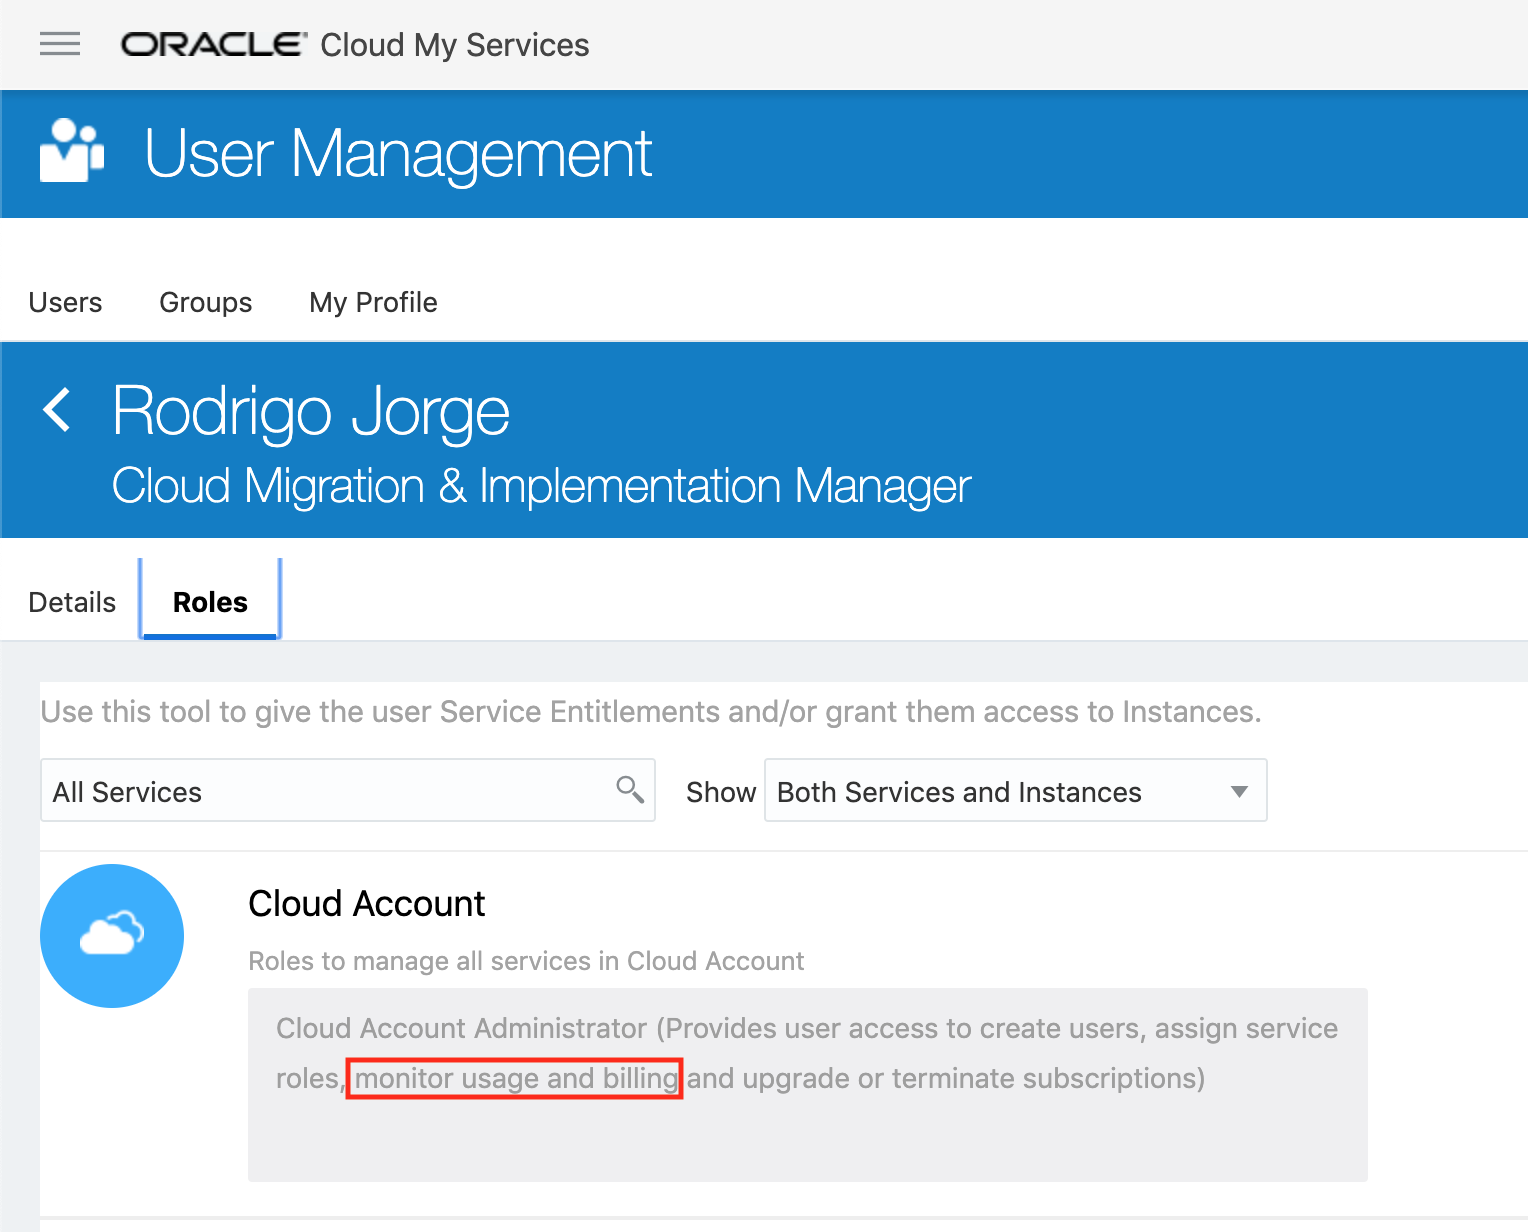
So this approach is not valid for a read-only access. We need to use an application account instead if we want to be more restrictive.
So, in summary, why to use an application and not a user account?
- You can’t be restrictive with user account privileges. As said above, the account will need to have “Cloud Account Administrator” role (which is the most powerful Cloud privilege) to have access to the billing.
- User accounts can be protected by multi-factor authentication and will not work on your REST calls.
How to create a restricted application account
1 . Connect to your Oracle Identity Cloud Service
Usually the link to open it is “https://idcs-xxxxx.identity.oraclecloud.com/ui/v1/adminconsole/”, where xxxxx is your account ID. If you don’t know it, you can connect to your cloud via https://cloud.oracle.com/en_US/sign-in, go to oracle cloud homepage dashboard, click on Users button in the top right and then in the “Identity Console” option that will appear, also in top right. If you still can’t see it, maybe your account has no permissions to access the IDCS Service.
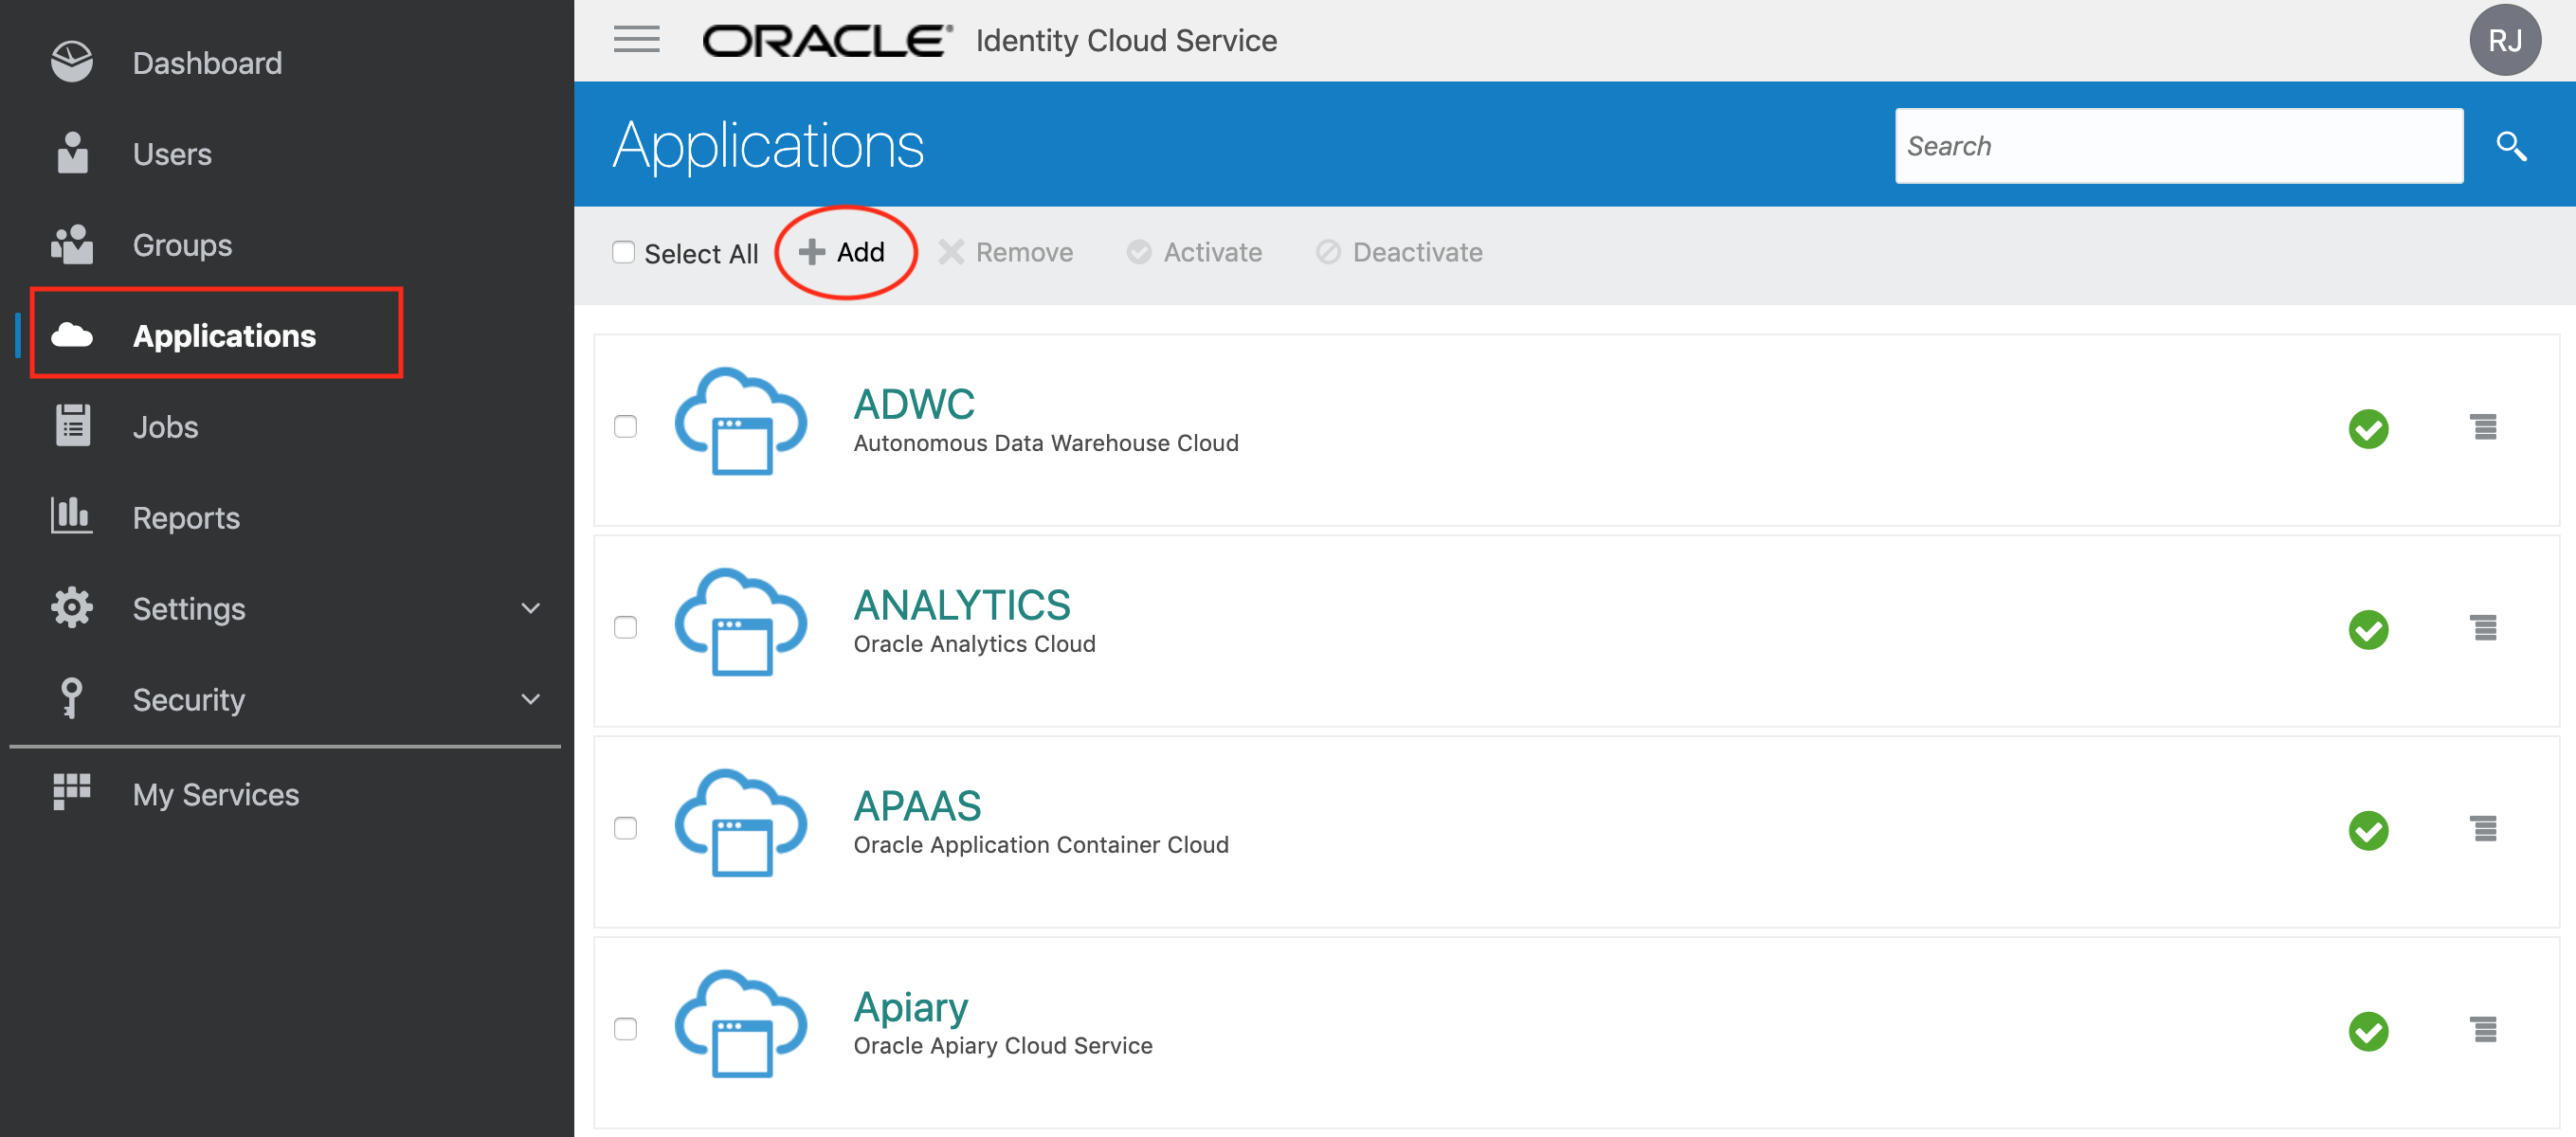
2. Open Application Page and add a new one
Once in IDCS Portal, click on the hamburger button (three lines on top left), go the Application page. Click “Add”.
3. Create the application and give the right permissions
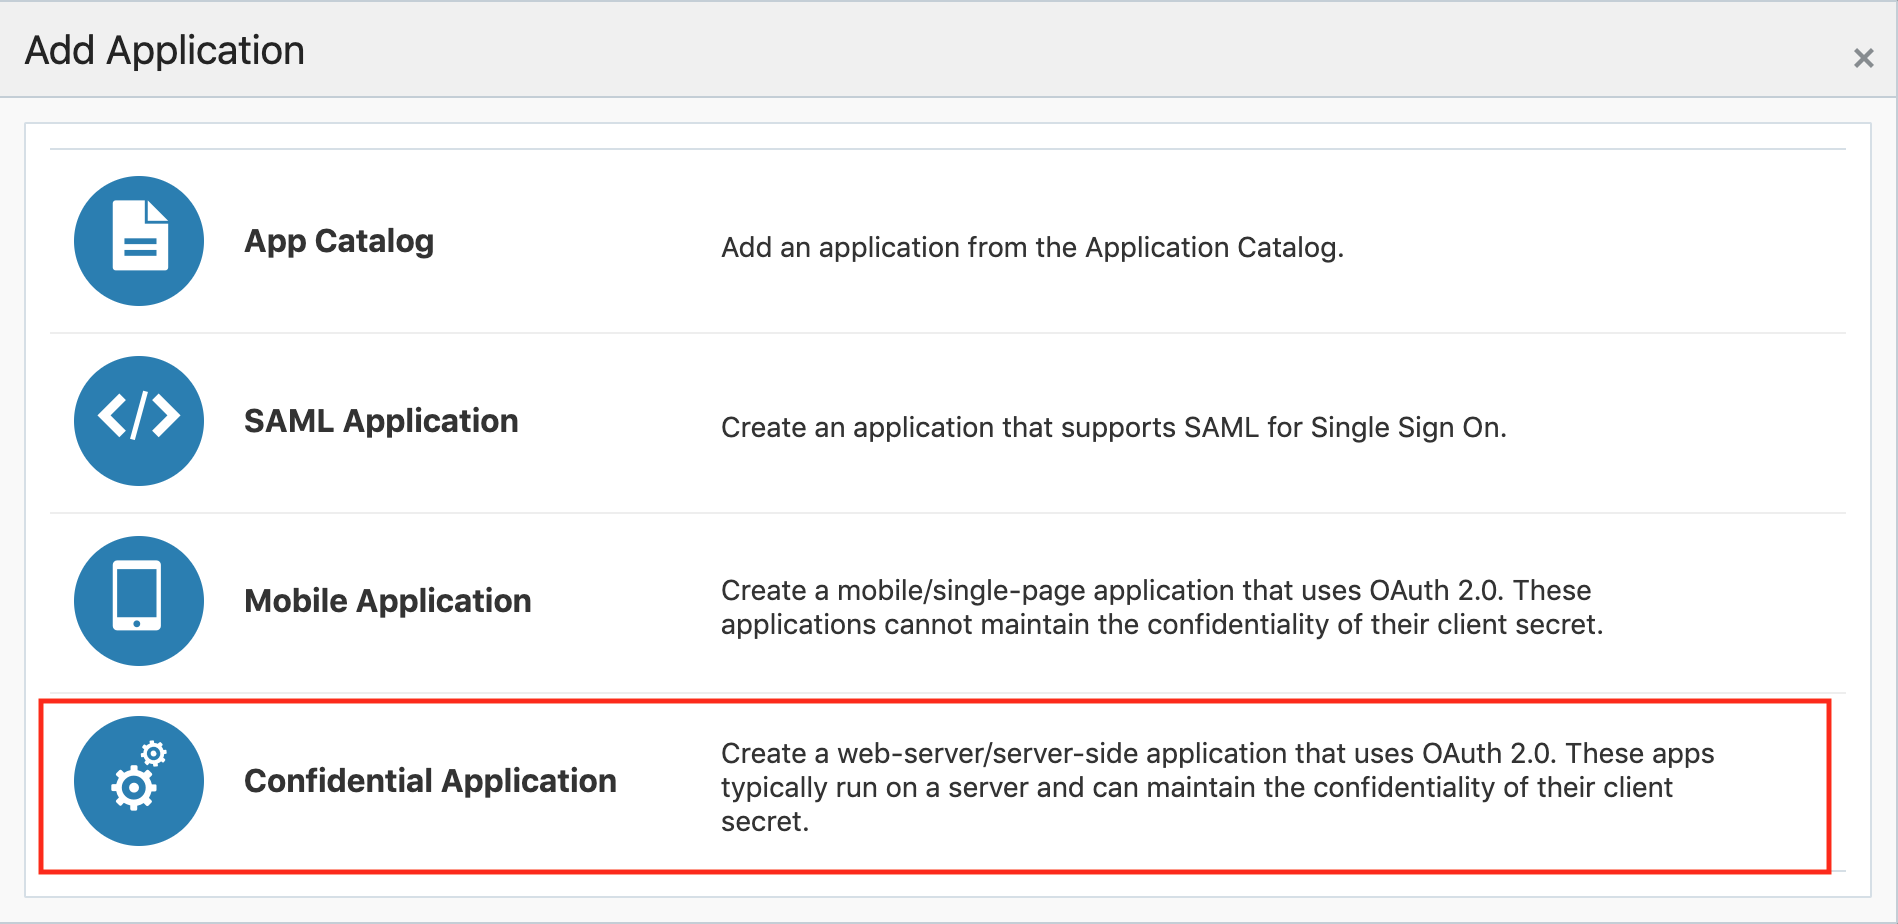
After you click on the “Add”, several application types will be displayed. Choose “Confidential Application“:
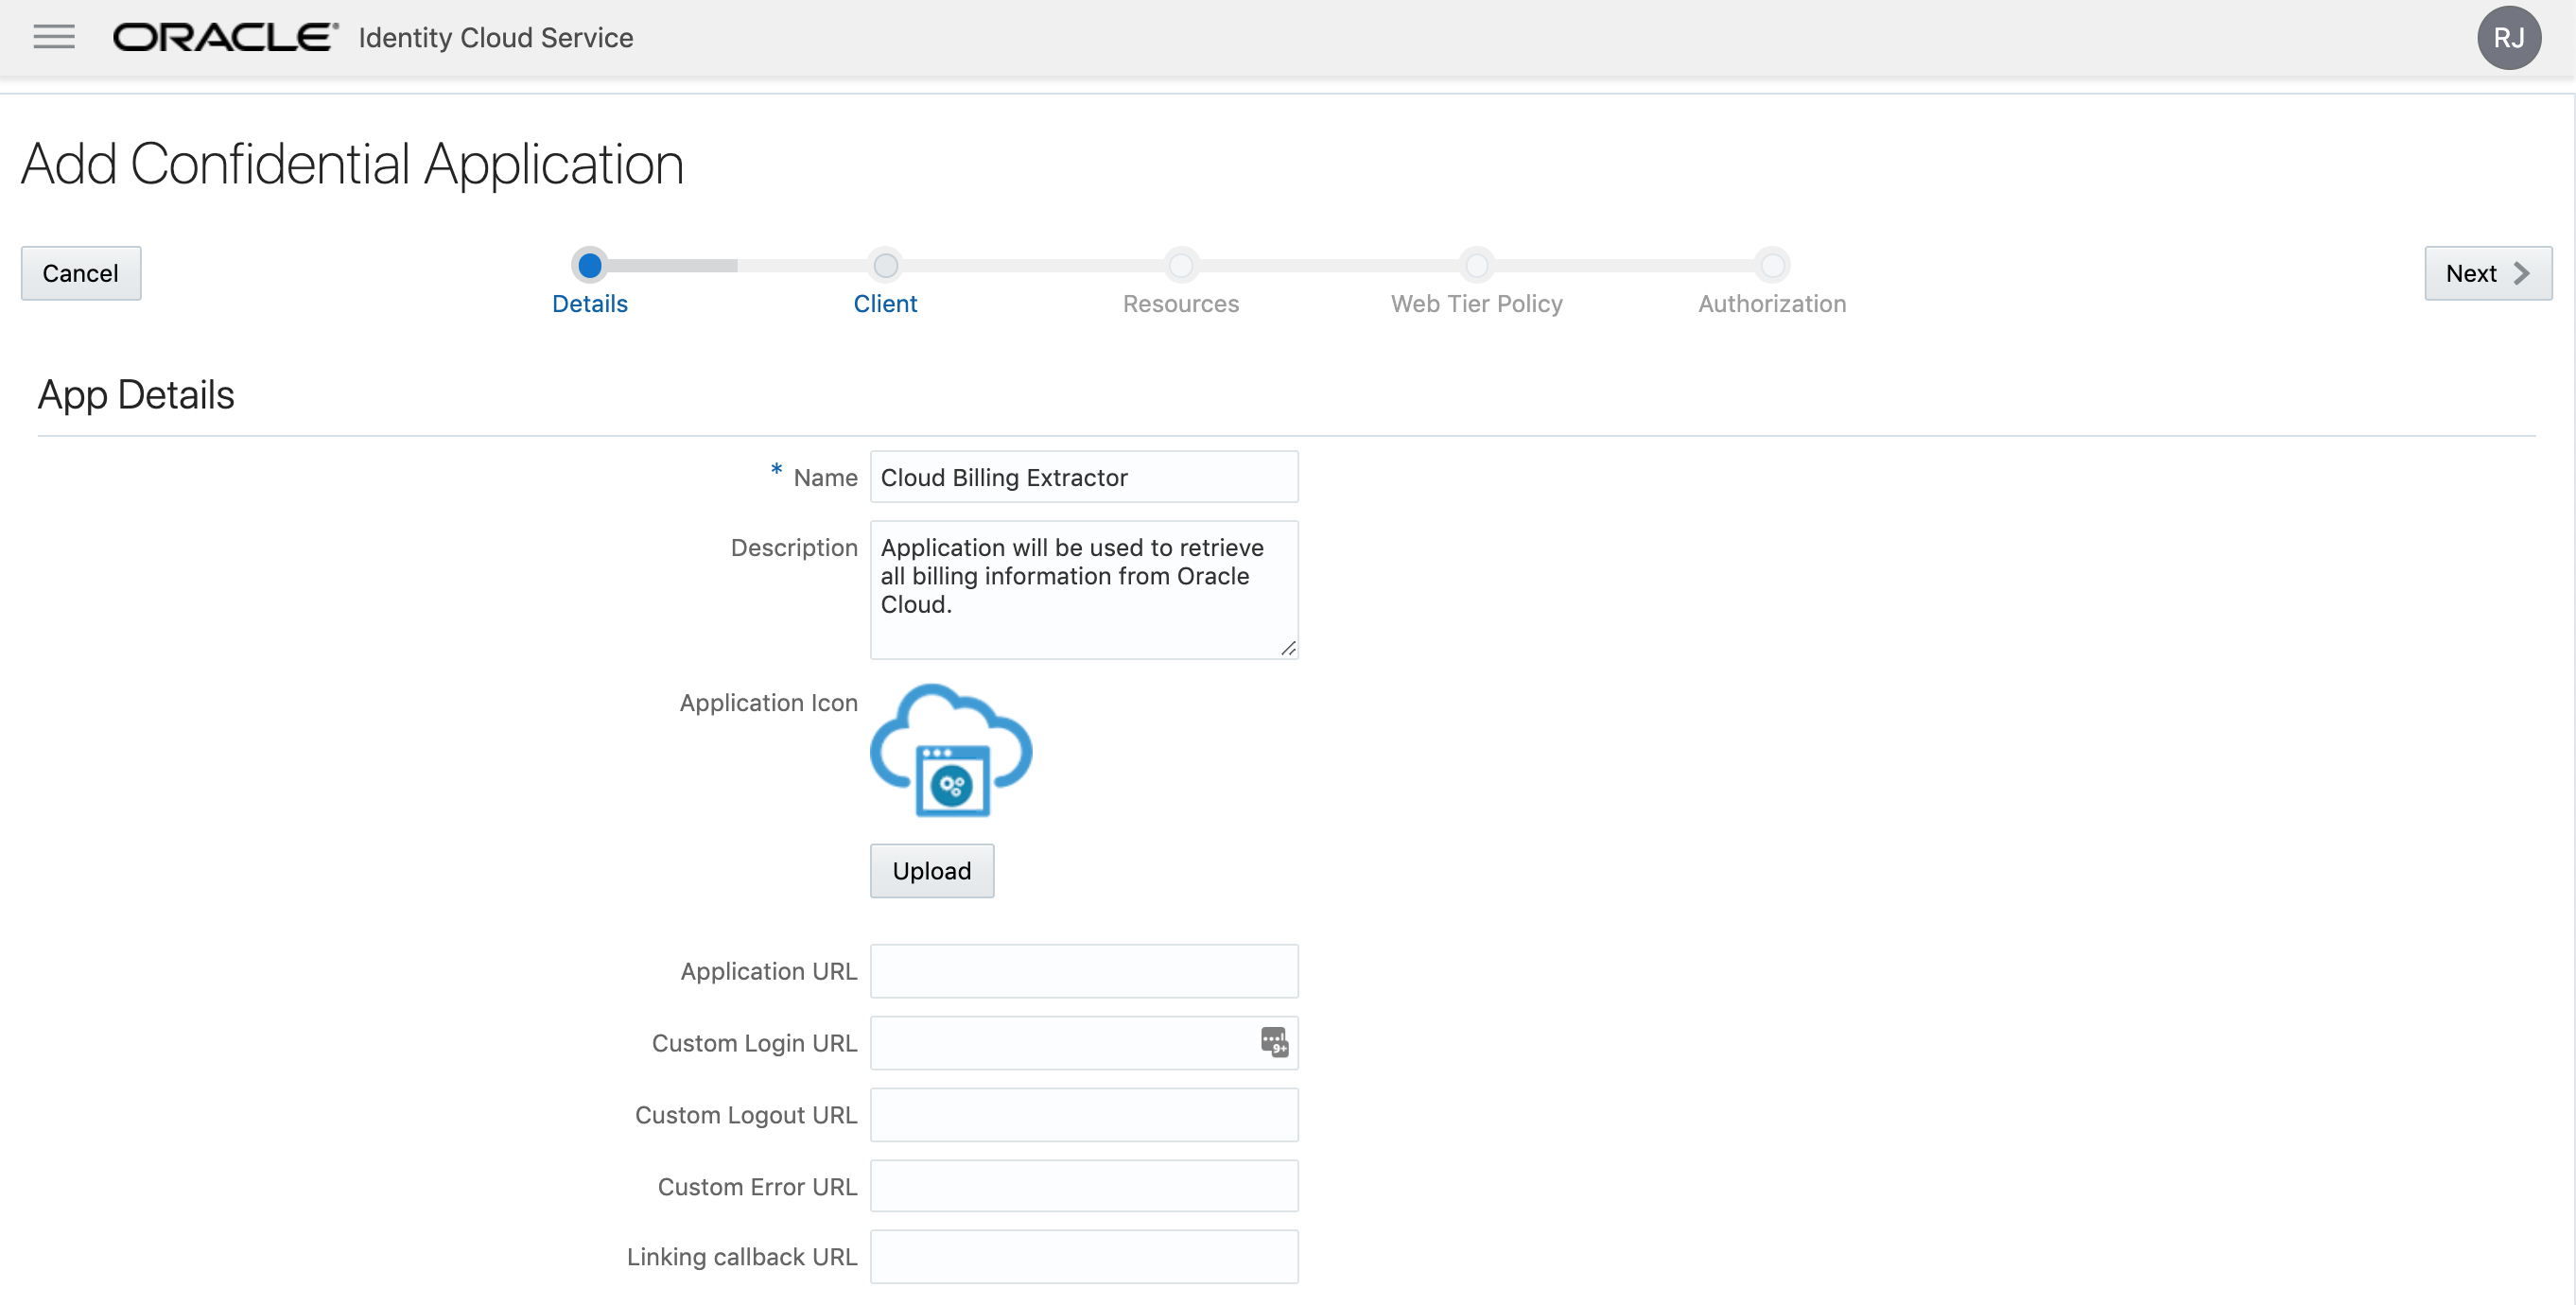
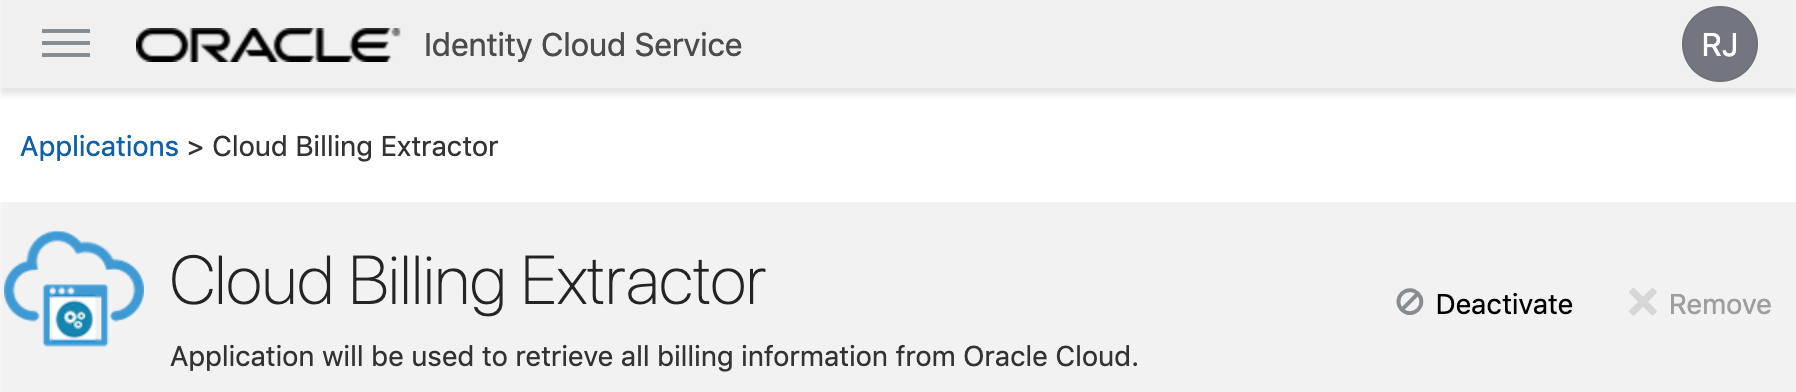
Give the application a “Name” and a “Description“. All other fields can be left empty. In this example, as this app will be for retrieving billing info, I’ve named it “Cloud Billing Extractor”:
Now it’s time to set up our new application. Select “Configure this application as a client now”. Check the “Allowed Grant Types” options:
- Client Credentials
- JWT Assertion
- Refresh Token
Don’t click Next yet, roll down as there are more things to set on this page.
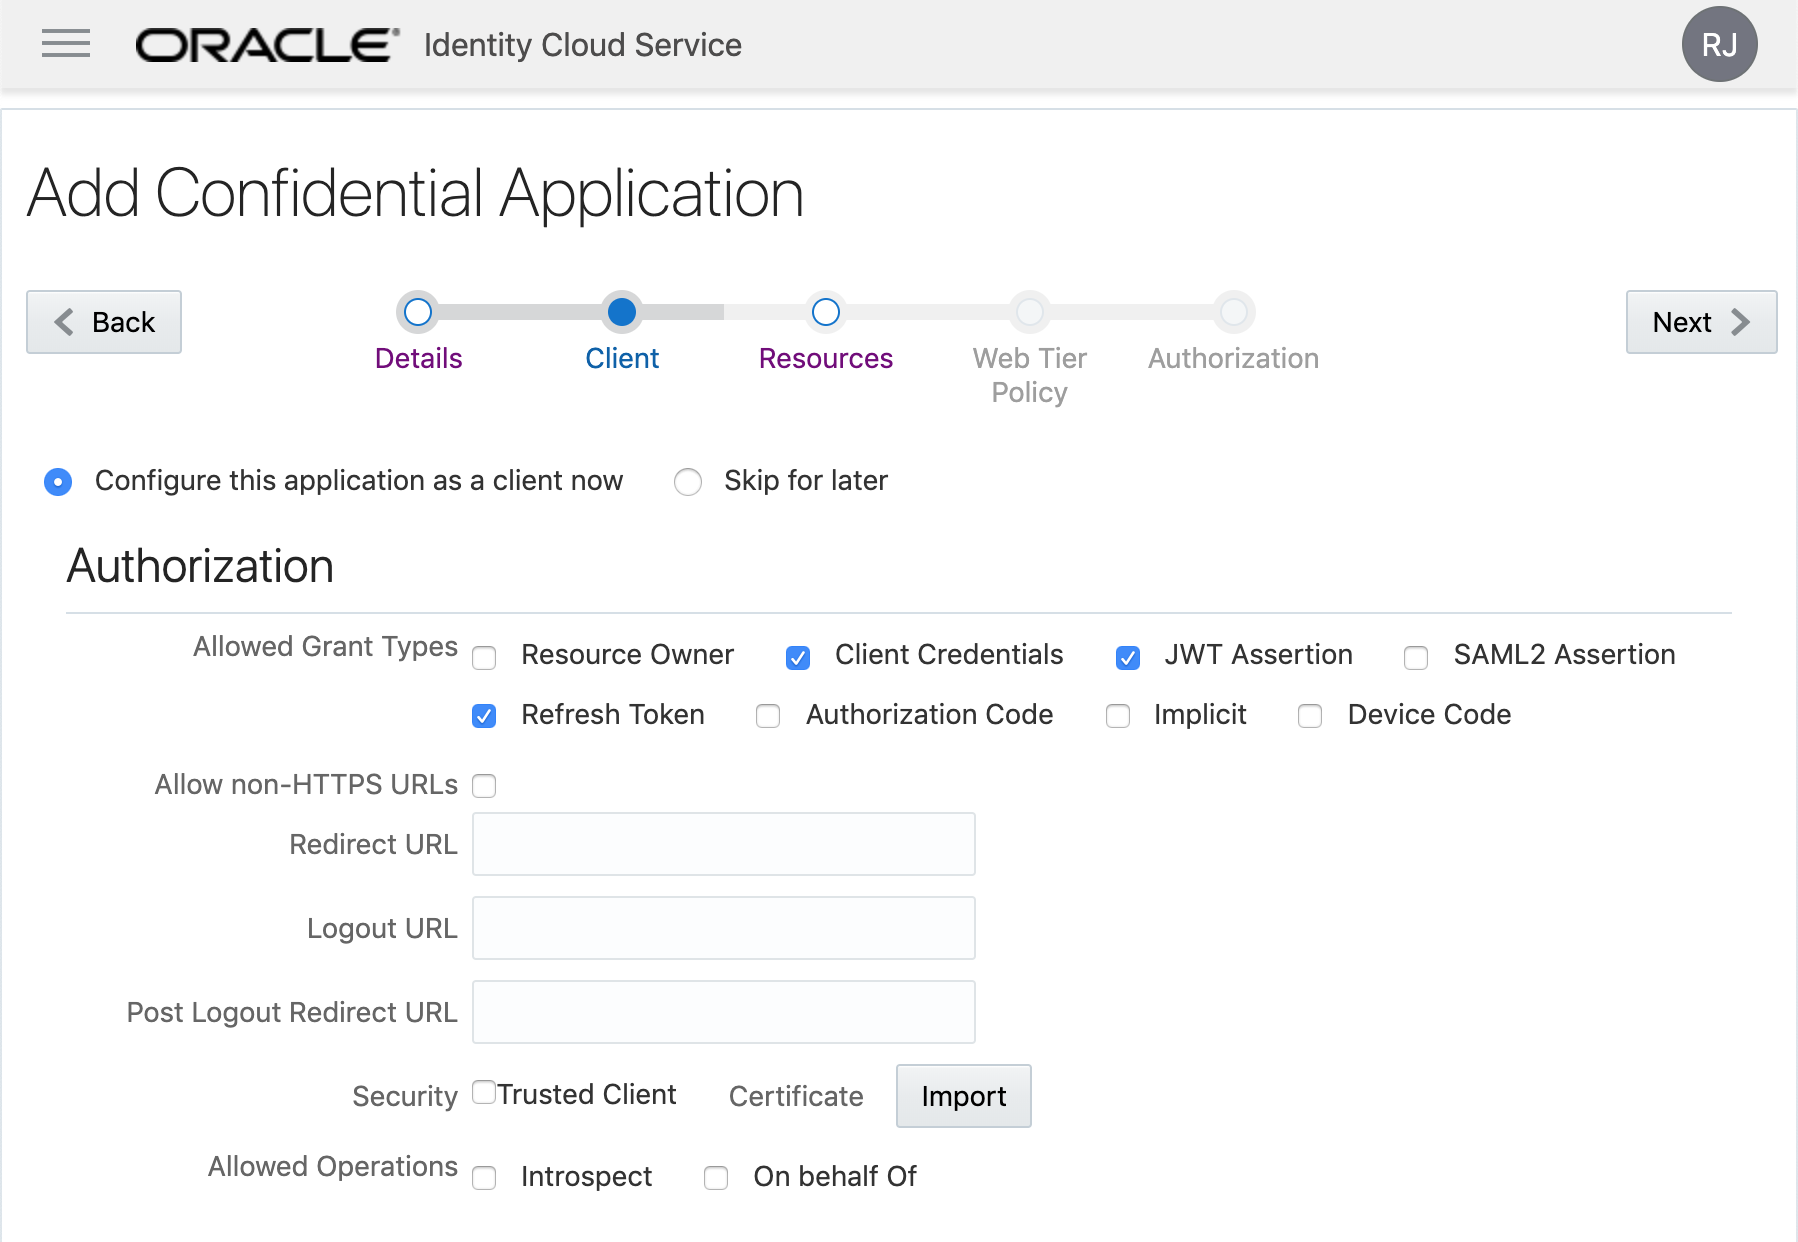
Now is the most important part: your application permissions. In the “Authorized Resources“, select “Specific” and click on “Add Scope”.
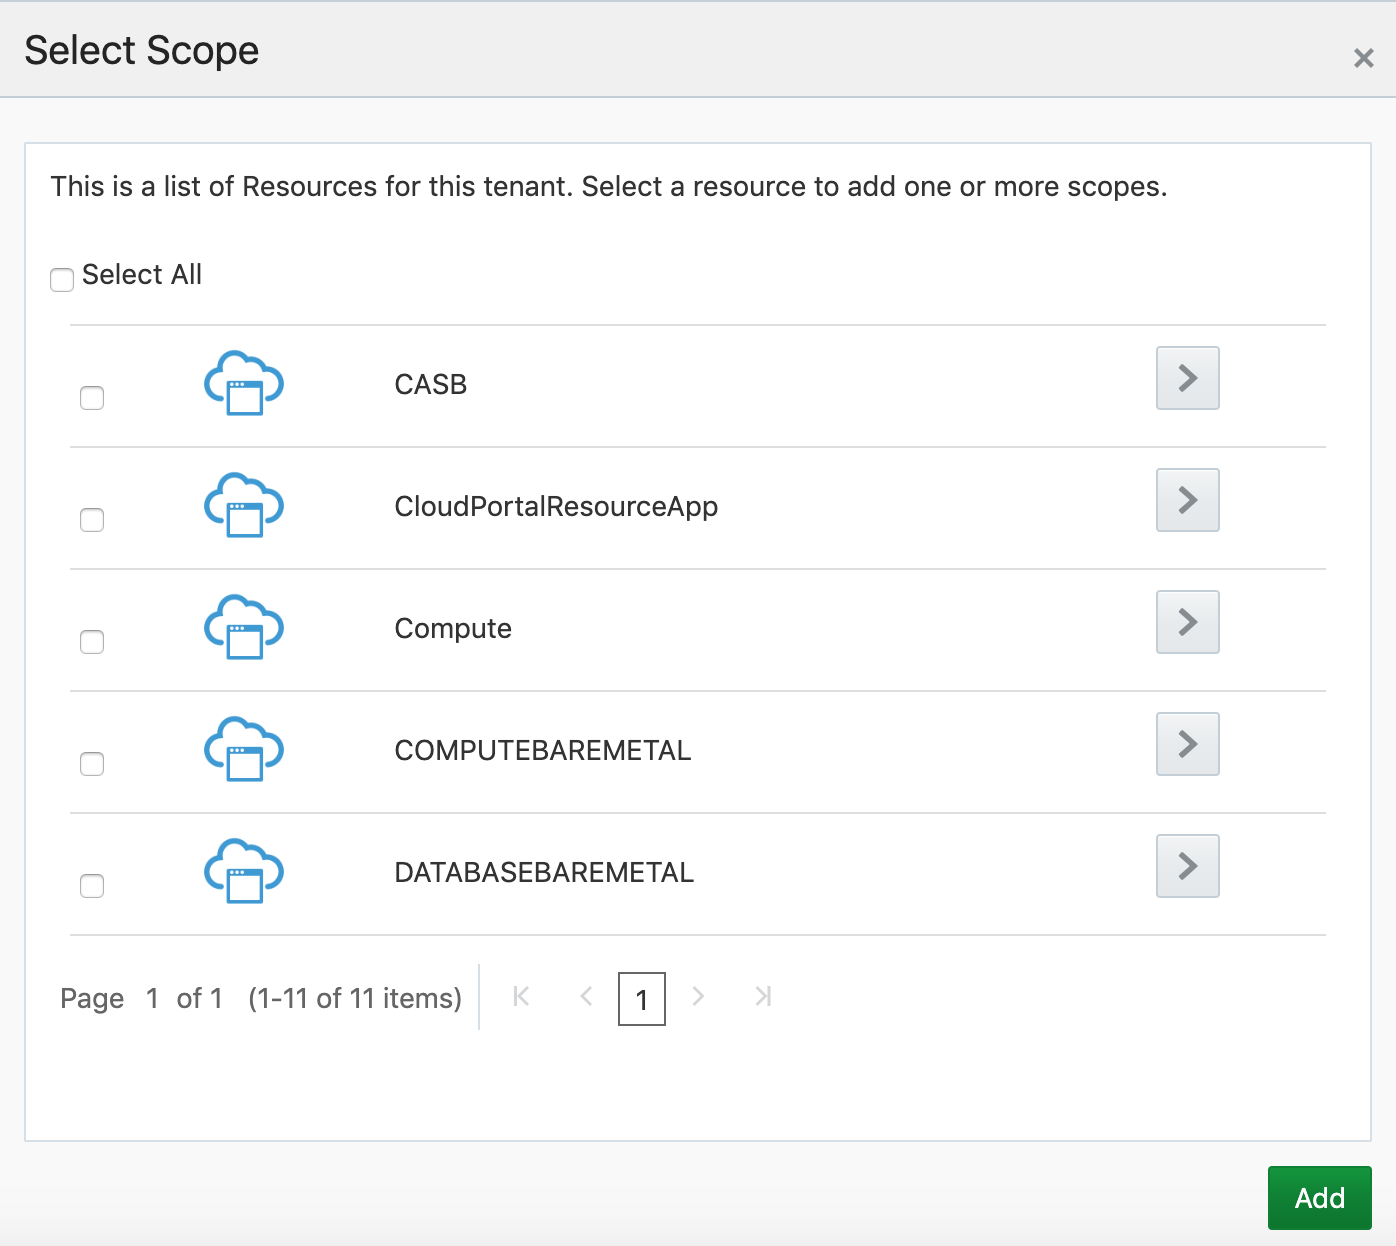
Now open “CloudPortalResourceApp” and select the only two following options:
- urn:opc:resource:consumer:cp:itas:myservices::read
- This will grant you permissions to list all services through the API url “/myservices/api/”
- urn:opc:resource:consumer:cp:itas:metering::read
- This will grant you permissions to retrieve all billing info through the API url “/metering/api/”
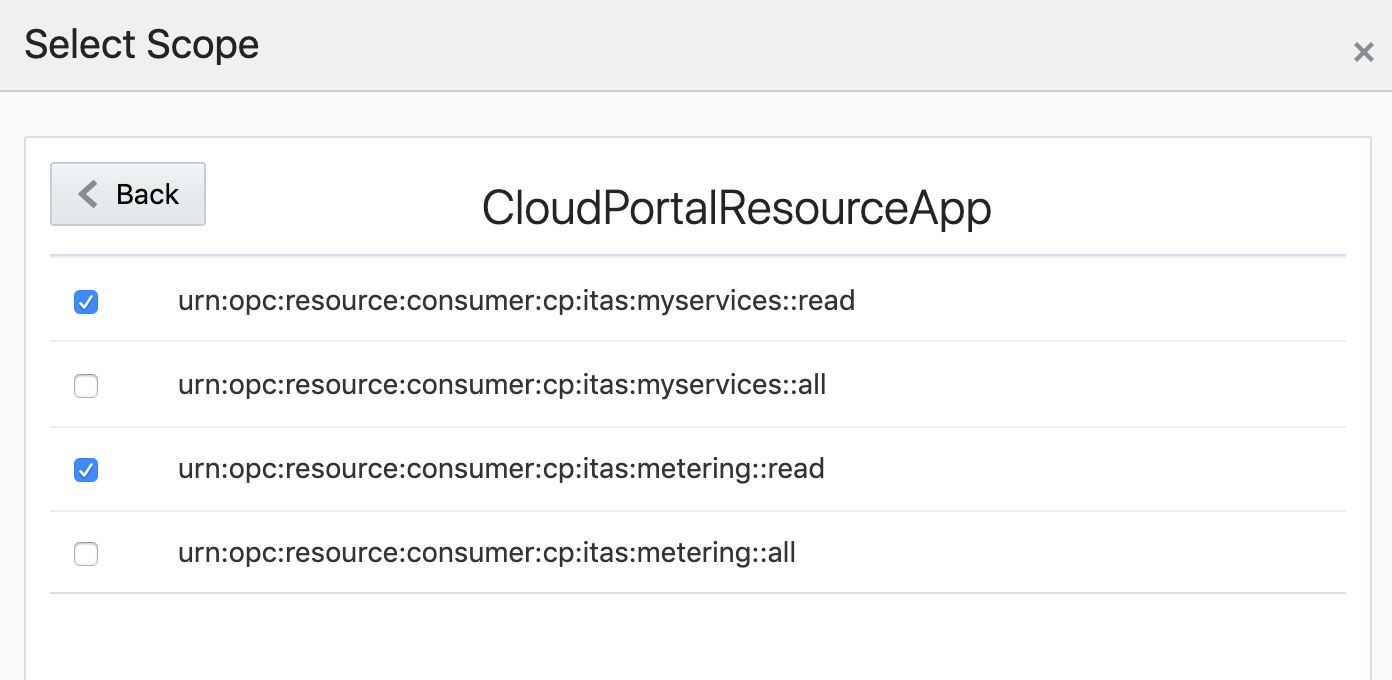
This is how it should look after adding:
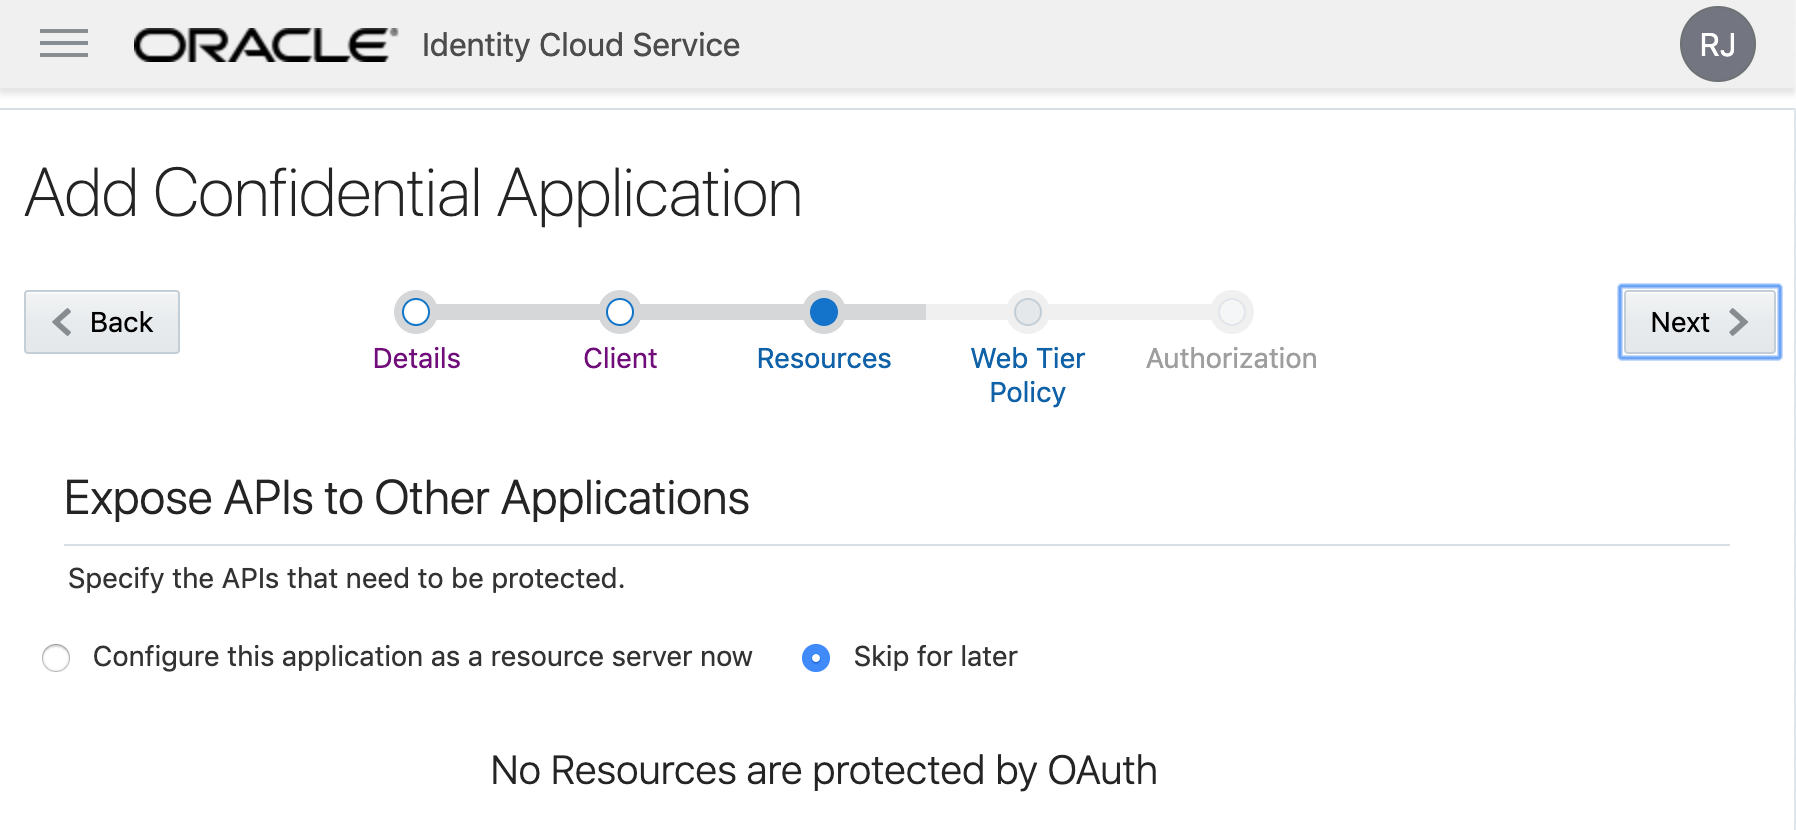
Now click Next. In the “Resources” tab, keep the default “Skip for later” and on “Web Tier Policy”, select “No Web Tier Policy“:
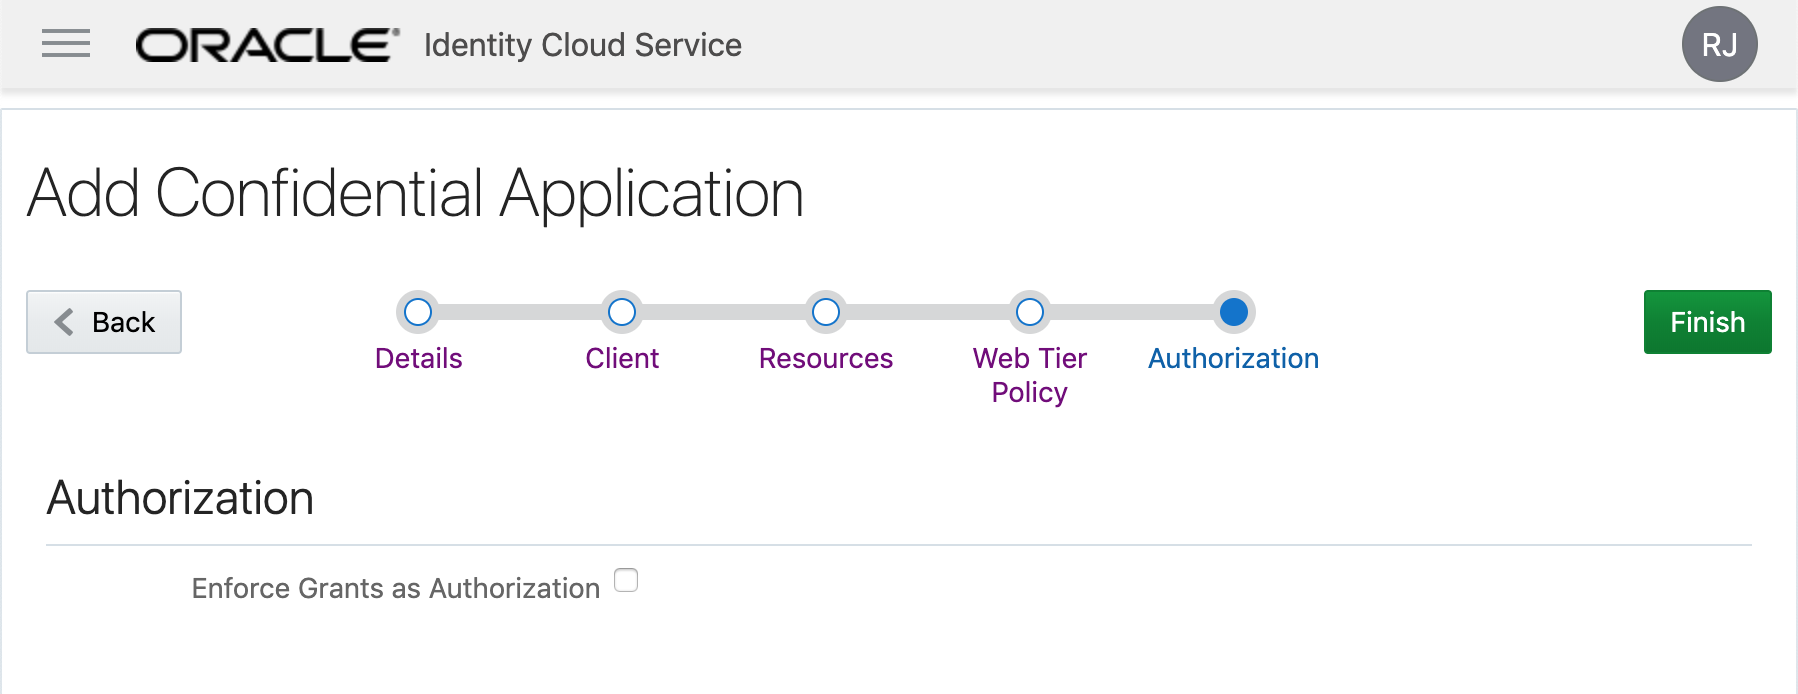
Finally, keep also unchecked the “Enforce Grants as Authorization” and press “Finish“:
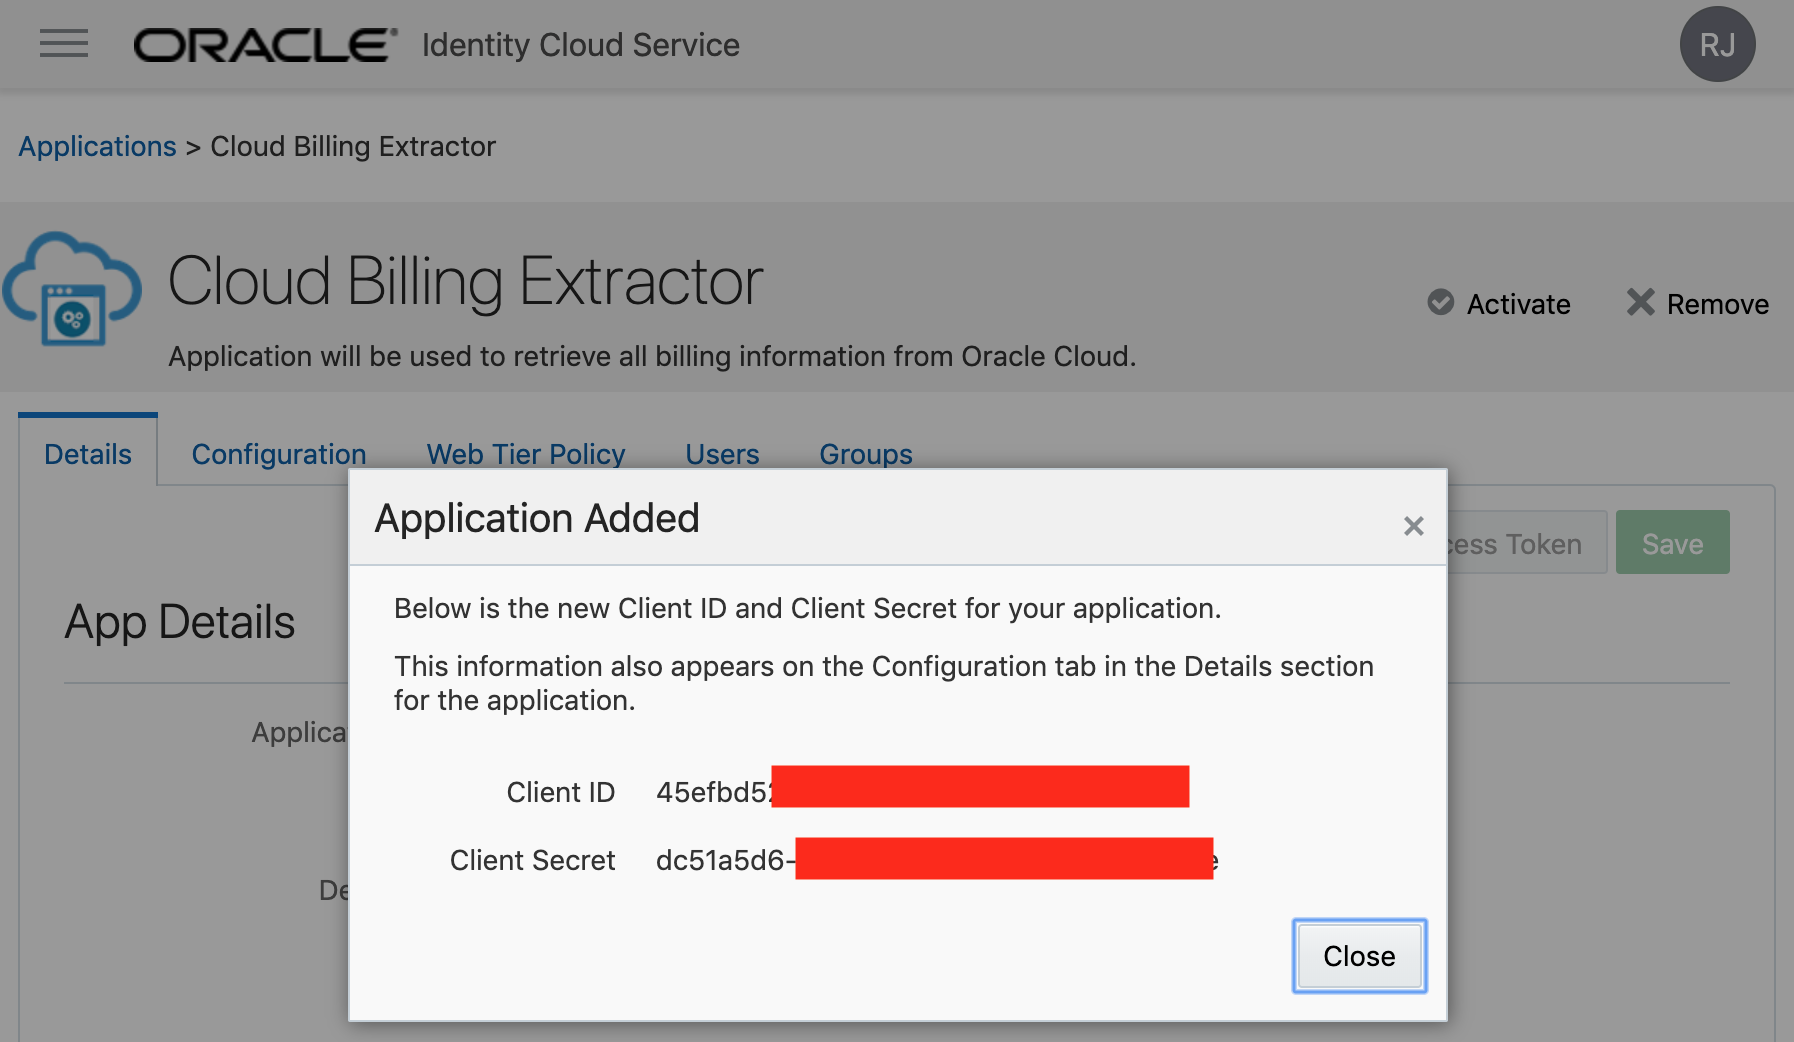
The Application Client ID and Secret will be showed. Note them down because they are the credential to access your billing info:
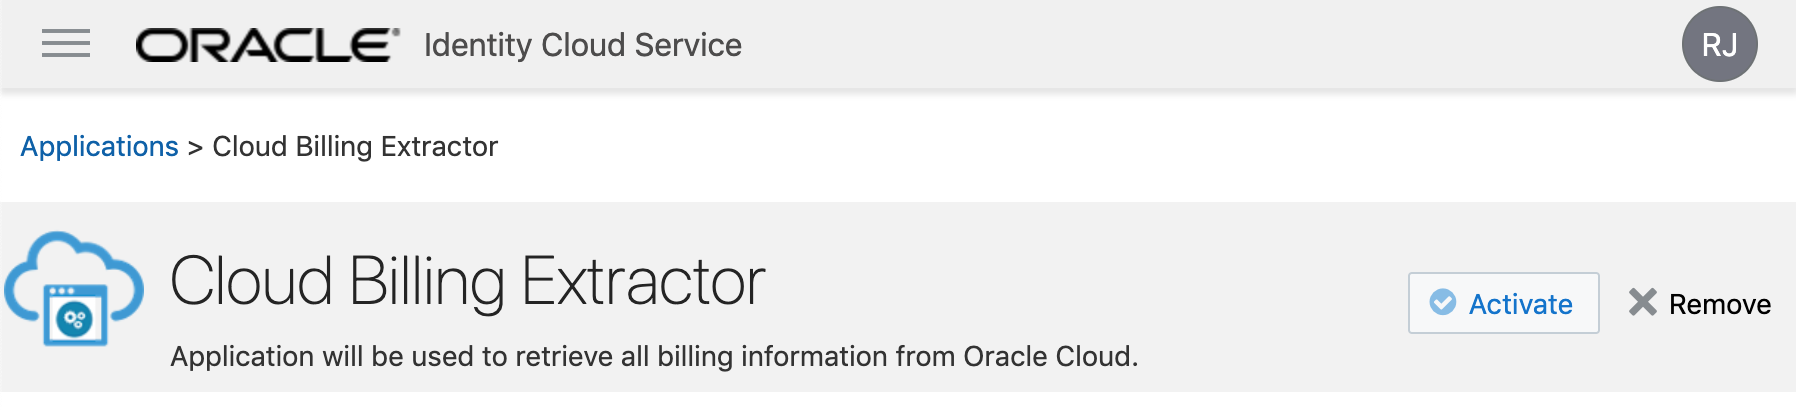
Finally, Activate your application:
And we are done:
Let’s test it
Now, you can use CURL to retrieve all your billing information as JSON output (you can later load JSON into Oracle tables to better analyse, but this is this for now out of the scope of this article).
To connect an application though curl, first you need to authenticate and get a token to connect. To do so, we will use the “/oauth2/” API.
To get a token, you need to pass your Client ID and Secret to your IDCS url, also giving the scope that you want to access. In the example below, I’ve used the urn:opc:resource:consumer:cp:itas:metering::read:
$ CLIENT_ID=8d8f249108569685587cf53dd7033cca
$ CLIENT_SECRET=8a47c450-8969-7a13-c441-34d819847c8e
$ IDCS_URL="https://idcs-a941be48a1c2175e8951bda897c375aa.identity.oraclecloud.com/"
$ curl -X POST -u "${CLIENT_ID}:${CLIENT_SECRET}" -d "grant_type=client_credentials&scope=urn:opc:resource:consumer:cp:itas:metering::read" "${IDCS_URL}/oauth2/v1/token"
{
  "access_token": "qbKjv3cacoM97mwFy5j1hZOC5cBQFdfJUJX0nmEd6pa4aM9Y9HvrOlXQngZzHuv2zw1aPG4ytHaA7jQPiSFDUWZQqjLFOalqCDdLRFQlUuSamUcvGhDcUmI36FjbbvOE4WNvDhdxdBKDf3rQsa8rMUbXiVMyvIxJfiXCZt7XWWDT3nFaoDKVb11kQnqHRW08JLpZyNIB1BUbExcdA5wQD6qB61YMhyYK2yZyO3CIfBQnEMRJiuBy3icZvQcSVepKAUKMFh1gUbynDqF0cD7ej79Uc3aovVtp8sHL4xHy1DRAvH1W6N8QJhoUkAOdxUW3NbPxsrn3zPeD2TLnMl6h1Vta6ADEZTekkj4fMmAzajC1AJtk37bmj2i1htw6nteHkS8MUAU8bQnrtLELO008agHfHB0ady0UAvRi3SwnDKlg2J7TYPQ39dDyCKT34soT0cYszYiDSgNbaTpzDcvFOHEUsy4NAPlIQq3iRfDMJSNlLFDkxUVjG11FW9FFwQwo5u7uYwrQP9YoaZK4lc6wEzPF5dEPYffw0orxvhyVGsxmtp1Vg8SpJMAPSQdRSyagcW0JaKRWdLUJo9bCAhJO1FF6jlzSi2umMuHyZgXo95uROjezxaqXM1w0DbgNSjp5u4p5o1BPygq8xJDI5ZHgnkIHWl7vVijNl4Jr47Yqpn8rGOd6wbdAzv0U0kKy7Dlo5waIB5cB7stvtLzMSv84AuWEx2CzFvLXRWD4gfRZnK22RKe0tJRMBZ6zGKMDuh20sSkk5LMDqEHmA2cZxWqtEgNrMvJjZvwoaG3RCHFEIw21hRyrv2ItPfBeZfcElC3uzSPCthVosL4x8MZwPxkiAUJKYrNl6jE8fGjHFxoknqUlrij84WDoGXCXL7mliHdOb7sFaNrV6GvQq8lskAtEqoUDODdFr7t171KOuwVVrkIX8ymrhnuYSo8ARsDGXVVFXg7FYdN7SDft6IDRAfVN6NNcXvkB7xNBunfElEMvPeCAExv9rKdyKReoos6FP3X3fu1fblNWkADaoUJbybvv3v24N51UuzIk2Giou7IUjZgik7dxytTVfd1KtmXswHUq3L2WqSvQthSOROwz9iDCAeihojvMhwYCSDqYQWa8omJYTCP3EE46tuidOApGY0oEyQQ2ZcoqhIGTr6RyGqhNX2DAMAkQf1b4JLuUfkrswUglgWnzieoI1XXtEfLlLOXDYIYQZK1ir3RDT3x9foH5XvPtQZyqiM7G52Q0A8yXNoRkjdduI2fySWQIjdW00kBVRtmtkw80O8jPAOH3dg0yxmEAiXH1pKTHt7DNQcn56Q6RJMezp98iegcSpam3uTBxnqYeUxfXxkLIwOJsJgsxQBgfbj4NbwnUJHLCcfqv0mrTS6b9cjnM32aGmibpzqYBYzgQQWW7yHVyF9cUkuUws7p3KcFOM",
  "token_type": "Bearer",
  "expires_in": 3600
}
Note that the variable values were faked here for security.
The returned value is a Bearer Token valid for 1 hour (3600 seconds), I will export it into another variable as I’m using it on later curl calls to get the billing info:
$ IDCS_TOKEN="qbKjv3cacoM97mwFy5j1hZOC5cBQFdfJUJX0nmEd6pa4aM9Y9HvrOlXQngZzHuv2zw1aPG4ytHaA7jQPiSFDUWZQqjLFOalqCDdLRFQlUuSamUcvGhDcUmI36FjbbvOE4WNvDhdxdBKDf3rQsa8rMUbXiVMyvIxJfiXCZt7XWWDT3nFaoDKVb11kQnqHRW08JLpZyNIB1BUbExcdA5wQD6qB61YMhyYK2yZyO3CIfBQnEMRJiuBy3icZvQcSVepKAUKMFh1gUbynDqF0cD7ej79Uc3aovVtp8sHL4xHy1DRAvH1W6N8QJhoUkAOdxUW3NbPxsrn3zPeD2TLnMl6h1Vta6ADEZTekkj4fMmAzajC1AJtk37bmj2i1htw6nteHkS8MUAU8bQnrtLELO008agHfHB0ady0UAvRi3SwnDKlg2J7TYPQ39dDyCKT34soT0cYszYiDSgNbaTpzDcvFOHEUsy4NAPlIQq3iRfDMJSNlLFDkxUVjG11FW9FFwQwo5u7uYwrQP9YoaZK4lc6wEzPF5dEPYffw0orxvhyVGsxmtp1Vg8SpJMAPSQdRSyagcW0JaKRWdLUJo9bCAhJO1FF6jlzSi2umMuHyZgXo95uROjezxaqXM1w0DbgNSjp5u4p5o1BPygq8xJDI5ZHgnkIHWl7vVijNl4Jr47Yqpn8rGOd6wbdAzv0U0kKy7Dlo5waIB5cB7stvtLzMSv84AuWEx2CzFvLXRWD4gfRZnK22RKe0tJRMBZ6zGKMDuh20sSkk5LMDqEHmA2cZxWqtEgNrMvJjZvwoaG3RCHFEIw21hRyrv2ItPfBeZfcElC3uzSPCthVosL4x8MZwPxkiAUJKYrNl6jE8fGjHFxoknqUlrij84WDoGXCXL7mliHdOb7sFaNrV6GvQq8lskAtEqoUDODdFr7t171KOuwVVrkIX8ymrhnuYSo8ARsDGXVVFXg7FYdN7SDft6IDRAfVN6NNcXvkB7xNBunfElEMvPeCAExv9rKdyKReoos6FP3X3fu1fblNWkADaoUJbybvv3v24N51UuzIk2Giou7IUjZgik7dxytTVfd1KtmXswHUq3L2WqSvQthSOROwz9iDCAeihojvMhwYCSDqYQWa8omJYTCP3EE46tuidOApGY0oEyQQ2ZcoqhIGTr6RyGqhNX2DAMAkQf1b4JLuUfkrswUglgWnzieoI1XXtEfLlLOXDYIYQZK1ir3RDT3x9foH5XvPtQZyqiM7G52Q0A8yXNoRkjdduI2fySWQIjdW00kBVRtmtkw80O8jPAOH3dg0yxmEAiXH1pKTHt7DNQcn56Q6RJMezp98iegcSpam3uTBxnqYeUxfXxkLIwOJsJgsxQBgfbj4NbwnUJHLCcfqv0mrTS6b9cjnM32aGmibpzqYBYzgQQWW7yHVyF9cUkuUws7p3KcFOM"
To get the billing info you need, you can use several endpoint that are listed here: https://docs.oracle.com/en/cloud/get-started/subscriptions-cloud/meter/rest-endpoints.html
For this example, I want to get usage cost information daily grouped for the first 5 months of the year (from 1st of January until 1st of June 2019).
Please note that this endpoint also required your cloud account name, that can be retrieved also from your MyServices URL. It can start with “cacct-” followed by some chars and numbers. If you don’t know it, just put anything and the error message will give you back the correct value.
$ CLOUD_ACCOUNT=xxxx

$ curl -X GET -H "Authorization: Bearer ${IDCS_TOKEN}" "https://itra.oraclecloud.com/metering/api/v1/usagecost/${CLOUD_ACCOUNT}?startTime=2019-01-01T00:00:00.000Z&endTime=2019-06-01T00:00:00.000Z&usageType=DAILY&timeZone=UTC&dcAggEnabled=Y"
{
  "httpStatusCode" : 400,
  "httpMessage" : "Bad Request",
  "executionContextId" : "005YaovmbC91FgyN06V4EF0002Zo00002t,0:1:1",
  "errorCode" : "urn:oracle:cloud:errorcode:tas:illegal-argument",
  "errorMessage" : "Domain mismatch url=/api/v1/usagecost/xxxx?startTime=2019-01-01T00:00:00.000Z&endTime=2019-06-01T00:00:00.000Z&usageType=DAILY&timeZone=UTC&dcAggEnabled=Y, domain=null:cacct-eca5d8e87eab38eea3afedb6fdcc1842"
}
Note that in the end of “errorMessage“, we have “domain=null:cacct-eca5d8e87eab38eea3afedb6fdcc1842“, meaning that my cloud account is actually “cacct-eca5d8e87eab38eea3afedb6fdcc1842“. I will export it and try again:
$ CLOUD_ACCOUNT=cacct-eca5d8e87eab38eea3afedb6fdcc1842

$ curl -X GET -H "Authorization: Bearer ${IDCS_TOKEN}" "https://itra.oraclecloud.com/metering/api/v1/usagecost/${CLOUD_ACCOUNT}?startTime=2019-01-01T00:00:00.000Z&endTime2019-06-01T00:00:00.000Z&usageType=DAILY&timeZone=UTC&dcAggEnabled=Y"
(after 2 minutes)
{
  "accountId": "cacct-eca5d8e87eab38eea3afedb6fdcc1842",
  "items": [
    {
      "subscriptionId": "1320391",
      "subscriptionType": "PRODUCTION",
      "serviceName": "COMPUTEBAREMETAL",
      "resourceName": "PIC_BLOCK_STORAGE_STANDARD",
      "currency": "BRL",
      "gsiProductId": "B88322",
...
And that’s it. Now we could create a secure and restricted application account with access to the Oracle Cloud billing metering data.
Have you enjoyed? Please leave a comment or give a 👍!


3 comments
Hi,
Thanks for this solution,
It solved my problem in how to use the billing API with environments on which MFA is forced and it allows to limit the access to just the billing information.
One important step I had to add to make this work is to enable the “access signing certificate” option in the IDCS options.
Luckily I found the solution for this also on your site: https://www.dbarj.com.br/en/2019/02/verify-access-signing-certificate-in-settings-in-oci-when-running-curl-rest-calls/
Author
Yes, glad you enjoyed. Indeed it is also required to enable “access signing certificate” if not enabled for the tenancy.
Regards,
RJ
RJ,
Your post is excellent and has lots of information. We are trying to create a group and include only users who will have access to billing information. So based on your post, once you create a application. Can’t we access the application from cloud directly without using CURL to get the information.
Thanks
Ravi